Tuesday, June 22, 2021

FREE Shipping!!!


 Have you had some items you've been meaning to get from the Mini Catalogue (it ends on June 30), or some new items from the new Annual Catalogue.......take advantage of FREE SHIPPING on Thursday, June 24 for all qualifying orders of $65 or more.

Remember to use this month's Host Code - HQSMM49W and receive a gift from me.

If you have any questions you can contact me at j-jeffery@live.com


Tuesday, May 18, 2021

Artistically Inked

I couldn't sleep yesterday morning, so I got up in the wee hours and went down to my craft room and stamped.....using the Artistically Inked stamp set.  This is just a clean and simple ink to paper, two layers with some masking card.  I included a scattering of gems from this suite's ephemera pack, but  overall the card is pretty simple.  The colours I've used for the flowers are Pale Papaya/Pumpkin Pie, Magenta Madness/Melon Mambo and Fresh Freesia/Highland Heather.  Pear Pizzazz was used for the leaves and Basic Black for the greeting.


The second card I created in the wee hours of the morning used the fabulous Expressions In Ink Specialty Paper.  I love this pack of paper so I let the paper do all the work for this card except for the die cut leaf sprig and some gold metallic pearls.  I didn't even want to add a label for the greeting.  Easy Peasy!

I've been working in my yard and relaxing on the deck these past few days - when no creating was going on - because of the good weather.  We've taken a turn though and it rained all night, which was nice because everything is so dry!  We're suppose to get some snow tonight and that's not so welcome!  But that's May in Alberta!  I'll just huddle in my craft room and use some more of my new products.

I've got a BOGO sale going on with my retired Stampin'Up! products.  It's all laid out in a newsletter, so if you are interested in receiving a copy of my newsletter to get ahold of some retired products just let me know my e-mail and I will forward a copy to you.  You can reach me at  j-jeffery@live.com

That's it for today,

Stay warm, stay dry, stay safe!

Joan


Friday, May 7, 2021

Lacy Elegant Thank You


 I'm still playing with the Elegantly Said Suite and silver and gold embossing powder today.  All embossing through and through.  I like this long lacy stamp; it adds that bit of elegance to the creation.

The flowers and greeting have been embossed in silver and the lacy piece in gold.  I've made the tag longer today and tied it with both the silver and gold Simply Elegant Trim.  The tag has been popped up with dimensionals.

Nothing much else to add today - the card really was quick and simple.

I hope you have a wonderful weekend.  Thanks for stopping by.

Joan

Thursday, May 6, 2021

Elegant Thank You


 Today I pulled out a couple of pieces of the Simply Elegant Specialty DSP.  I've combined Basic Gray/Silver and Gold which I don't think I've ever put together before. The flowers have been embossed in gold and fussy cut.

The new Elegant Tag punch is going to be quite versatile now that I've learned how to make different sizes of the tag and shapes.  Here I've shortened the tag because the greeting was small and I wanted more of the  gold and silver Simply Elegant Trim to show. 

To make the tag longer you would do the same thing except with a desired length.  The width of the tag is 1 3/4".  Rather than putting the cardstock through the proper opening of the punch, turn it over and insert the cardstock through the bottom of the punch into the slits available....and punch


Turn the punch around and do the same thing for the other end.  Here you can slide the cardstock to the length you are looking for.  I didn't have anything in particular in mind when I was doing this, but I will use the tag on a future project.

Here I've shown the original size of the tag (in Calypso Coral) and the tag I just made.

Another option is to have the fancy design at both ends of the tag.  Using various widths and lengths of cardstock you can create a number of different designed tags.  I'll work on creating some and share them with you.

Finally, I always stamp the corner of my envelope and I've started to stamp the inside of my cards also.  For this set I've embossed the flower in gold.

That's it for today.  I still have a couple of stamps in this set to play with so I will probably share them tomorrow.

Thanks for stopping by,

Joan


Wednesday, May 5, 2021

Simply Wonderful Birthday

I've been busy the last 5 days helping my daughter move and get settled into her new home, it has been a very busy time.  I finally got a chance to stamp yesterday using products from the new Simply Elegant Suite.  Although I didn't use it for this creation, I absolutely love the DSP that accompanies this stamp set and punch.

I've stamped the flourish in Basic Gray; as well as the greeting on Petal Pink card stock.  The shape that the greeting is on is the punch that goes with this suite and I've tied it with my favorite Petal Pink Organdy Ribbon.  This punch is a unique shape, but it's quite versatile - which I'll eventually show.

For the flowers, I inked the stamp using our markers since it is a negative image.  I then cut out the images with snips and used dimensionals to adhere them to the card.

We're waiting for some new furniture to arrive today, so it's going to be another busy day.... first waiting and then putting it together and getting it into place.  But busy is a good thing.

Hope things are a good kind of busy in your world.

Thanks for stopping by, Joan


A New Catalogue and some Promotions


Woo Hoo!  I'm a day late posting this - but the 2021-2022 Annual Catalogue is here.
I love this cover; it's so fresh and pretty.

You can browse through an on-line version HERE
 
If you asked for a catalogue to be mailed to you, you should be getting it shortly. 
If you would like one mailed to you, or would like to pick one up if you're in my area,  just let me know by e-mail.
 
Two Stampin'Up! promotions have begun.
 
First: The Join+ Promotion
Now is a fantastic time to join the fun of the Stampin' Up! family and my Inkspired Divas Team.
Your starter kit only costs $135 (no shipping) but you can choose $206 worth of any product of your choice! 
 

When you purchase the starter kit, you enjoy many perks such as:
  • Minimum 20% discount on all stamping supplies and products all the time
  • VIP Access: Be the first to see catalogues and order new product
  • Opportunity to earn extra $$$
  • Exclusive website full of stamping samples
  • Weekly emailed stamping inspiration
  • Chance to learn creative tips and techniques, share ideas, and come into contact with new friends who love paper crafting as much as you do!
  • Purchasing the starter kit is a Great Deal and there is no risk…just benefits!

    Why wait?  Do it for the Savings, the Earnings or just for the FUN of it!  
Get your Starter Kit now

Second: The Connect, Craft and Connect Promotion
All party orders that total $300 or more earn an additional $30 free stampin' rewards! 
I've started doing virtual stampin' social events during COVID and I would love to do one for you to help you take advantage of the extra host rewards! 
Yes!  You can be a party of one and still get the extra rewards. 
Contact me today to book your party!
 

 I also have a new Host Code for this month
BVSY6H9E 
 Place an on-line order this month AND used the Host code and receive a gift from me.
Enjoy the New Catalogue
Thanks for stopping by,
Joan 

Friday, April 30, 2021

Beauty of the Earth

Today I'm letting the Designer Series Paper do all the work.  This paper comes from the Beauty of the Earth Suite in the new catalogue.  The above card is quick and simple using one of the sheets that can be cut in half to get a forest of trees in wonderful colours.  The little tag comes with the coordinating Beautiful Trees dies.  I've cut the Night of Navy piece as a layer.  The colours I've used for this card are Cinnamon Cider for the base, Merry Merlot for the mat along with the Night of Navy.  I've wrapped the card with Linen thread as a bit of embellishment. 


Every piece of paper for this card is DSP except for the Basic White Greeting.  I love the papers in this series that can be used as a background or cut with the "leaves" to create the top of the tree.  The grass has been hand cut to create the little hill since our curvy dies are retiring. Everything else, except the greeting, has been cut using the Beautiful Trees Dies.

I've used the Many Messages stamp set with the coordinating Die. This stamp set has 19 different greetings on one stamp each with it's own little tag.  You can either stamp them all at the same time, or do what I've been doing and only stamp certain ones.

When the greeting I want is in the middle of the stamp I end up with more greetings then I need.

Next I place the die over the stamped image and tack it down with a piece of Washi tape.  My embossing plate has a bit of a warp in it (as they tend to do) and so the Washi tape ensures that the die stays in place and I don't have to do the job twice.

I could have used any of the greetings I ended up with, but I made my selection and will keep all the extras to go through at a later date.  There's also nothing that says you can't use more than one greeting on one card!  I like all these little tags because they fit easily into small places. You don't have to wait for the new catalogue to come out to get this set either.  It's in the Mini Catalogue so you can get it right now.


That's it for today.  It's going to be a busy weekend since we're helping our daughter move into a new house.  Exciting!!!  So I'll see you again on Monday.  Thanks for stopping by,

Joan


Many Messages - 154510 - $30.00   Messages Die - 154422 - $46.00

Thursday, April 29, 2021

Color & Contour Creations

I'm sharing two cards today created with the Color & Contour Bundle.....mostly.  I love when there is a stamp (for me it's particularly a single flower) that can be used to easily create your own DSP.  When I'm doing this I always start in the centre of the card stock and work out.  You can always stamp off the edges to fill in empty spots, it's hard to fill in central holes without overlapping.  I've stamped the three focal flowers in black; coloured two with a stamped off black and the third with Daffodil Delight.   The strip of Daffodil Delight has been embossed using one of the Greenery folders.  The greeting is from the Color and Contour stamp set, but I've used the larger round label from Tasteful Labels.  The labels and the flowers have been raised with dimensionals and, although it's hard to notice in the picture, the Daffodil flower has three rhinestones in the centre just for some added bling.

This card uses Pale Papaya as a base with Soft Succulent coordinating with it for the splatters, ribbon, gems and leaves.  The splatters are included in the stamp set. I think there is only one size of scalloped retangle that I haven't used from this bundle.  It is slightly smaller than the one used in the middle here which has been raised using the Foam Adhesive Strips.

That's it for today.  Thanks for stopping by.

Joan


  SAY  GOODBYE TO SOME  STAMPIN’ UP!  FAVORITES PLUS BIG DISCOUNTS ON SELECT PRODUCTS!  

Check out my website store and SHOP ON-LINE NOW.  Products are while supplies last so you don't want to miss out on something you just have to have.  Use this month's  Host code below when you are checking out to get your name put into a draw to receive a gift from me.

2CGY4HYF

SALE LASTS FROM MARCH 24 - MAY 3, 2021

WHILE SUPPLIES LAST!


Wednesday, April 28, 2021

Absolutely Amazing


 The next couple of days will be all about the new upcoming Color and Contour Bundle.  I'm planning on having a product included class in May, so I'm creating cards for that event. I love this flower and it's so easy to colour with the coordinating stamp......and cut out with the coordinating die.

The bundle includes the stamp set and the matching dies. The package of dies contains five scalloped rectangles of varying sizes.  I've used one of them with the Hydrangea Hill Mercury Glass Designer Acetate.  This is a very flashy card in real life.  The greeting is on the smallest rectangle.  I love the holes around the edges.  The white mat has been embossed with the Ornate Floral Embossing Folder.

The card base is Highland Heather to match the Acetate.  However, I stamped the flowers in Gorgeous Grape - having stamped ink off once so that it wasn't quite so dark.  The greeting has been done in the Gorgeous Grape also.

Counting down  - only 6 days until the new catalogue goes live.  If you haven't got a copy of the new catalogue let me know and I can get one into the mail for you - If you are in Canada.  You can contact me at j-jeffery@live.com.

I have a couple men working in my yard today; better go see what they're up to!  Thanks for stopping by today -

Joan

Tuesday, April 27, 2021

Funky Floral Thank You

This morning I got up early to create because I was hoping to get into the garden to dig things out of one of my flower beds.  It's a dismal sort of day, so I pulled out some fun bright paper and went to work.

I've used the Dandy Wishes Dies to create these funky flowers with petals matching the strip from the Pattern Party DSP which is in the upcoming catalogue to earn by hosting an event.  This package of DSP has coloured designs on one side and black and white patterns on the back. 

The colours I've used for the flowers are Pool Party, Pale Papaya and Flirty Flamingo.  Each flower has an Elegant Faceted Gem to add some bling.  I've used one of the Stitched So Sweetly labels (which are retiring at the end of the month) with the greeting coming from the Sweet Ice Cream stamp set.  The Painted Texture 3D Embossing Folder was used for the white background.  I think this is my favourite folder right now.  Thankfully it is carrying over to the new catalogue.

 Well, I've got a newsletter to work on and some cards to create so that will be it for today.  This card is going to be one of the ones we'll do at my May Card Class on May 11, 2021.  I'll post details on how you can attend, via Zoom, closer to the date.

Thanks for stopping by, hope you are enjoying your day.

Joan


Monday, April 26, 2021

Vibrant Quiet Meadow

I'm still playing with the Quiet Meadow silhouettes, (Meadow Dies).  I created this background using the Stampin' Blends with alcohol on Vellum cardstock.  I have step by step instructions for doing this technique on my April 12 post  HERE.

The colours I've used are Polished Pink, Fresh Freesia (both brand new In Colours) and Flirty Flamingo.  These are the colours of the flowers and the distressed ink around the flower edges also.

The Thank You actually comes from "Etched in Nature" and the little raindrops are the Clear Epoxy Essentials which are new in the upcoming catalogue.

That's it for a quick post this Monday evening.  It's been a busy day, but a good day!

Thanks for stopping by,

Joan
 

Sunday, April 25, 2021

Feel Better Friend Collar Fold


 This is another card I created last week.  I wanted to feature the single coloured side of the Hand-Penned DSP.....well, with this fold I'm showing both sides of the piece but the single colour is dominant.  I have stamped the second floral image from the Hand-Penned Petals stamp set, cut it out with the Penned Flowers Dies and coloured it with the stamps available.  

For the larger flower I used Night of Navy stamped off so it wasn't so dark.  I found that the Night of Navy matched the blue in the DSP better than the Misty Moonlight.  Garden Green was used for the leaves and Blushing Bride for the smaller flower.  I stamped the smaller flower with the wrong size stamp, so I restamped it, coloured it in with a Stampin' Blends, fussy cut it and popped it up with a dimensional.

The greeting, stamped in Garden Green is from the Hand-Penned Petals stamp set and a trio of the Genial Gems have been scattered and a green one has been placed in the centre of the small flower.

That's it for a Sunday Afternoon

Thanks for stopping by,

Joan

Saturday, April 24, 2021

Monochromatic Triangles

Today I'm sharing a card I made last week during my virtual card class.  I made and posted a rainbow card using the triangles on March 25 and that was the card my stampers were creating at the class.  I just wanted to try a black and white and  silver foil card using the same configuration. I've used the three smallest equilateral triangles from the Stitched Triangles Dies.  The greeting comes from  the Lovely You stamp set and is stamped onto a different triangle shape.  All of the triangle trios have been popped up with dimensional.  I really like how this turned out and may make some more with different greetings to have on hand.

That's it for a short and sweet weekend post.
Thanks for stopping by,
Joan

Friday, April 23, 2021

Meadow Silhouette Duo

Today I went back to my Meadow Dies from the Quiet Meadow Bundle which will be available in the new Catalogue May 4, 2021.  I saw these two cards (in a different colour and different configuration) created by Doris Fahey.  She gave me permission to CASE them and I love how they turned out.

For both cards I've used the Scalloped Contours Dies, which are new, and I feel I'm going to be using a lot.  I took one of the silhouette Meadow Dies for the focal image.  There are only two of the silhouette dies that fit onto this size scalloped background so I was a bit restricted.  Once cut out, I attached the piece to the background using our Foam Adhesive Strips.

The greeting comes from the Peaceful Moments stamp set and I was happy it fit onto the little tag from the Meadow Dies.  I'm needing to make a bunch of thank you cards.  For accents I've used the Fresh Freesia Open Weave Ribbon and one of the  2021- 2023 In Colour Jewels for the butterfly.


The reason I was drawn to Doris's cards was that she used the piece she die cut out for one card and used it on another.  We both used a second silhouette paired with it.  Nothing much else has changed for this card except I stamped the base of the card with the splatter that comes in the Quiet Meadow stamp set.  I always love splatter stamps!

I still haven't used all of the silhouette dies from this bundle, so stay tuned for more cards using these Quiet Meadow products.

That's it for today - Enjoy your day!

Joan
 

Wednesday, April 21, 2021

Hand-Penned Puzzle


 I've dipped into the Hand-Penned DSP,  and the Penned Flowers Dies again today.  Once again, the green focal piece is the backside of the background piece.  I went to the catalogue for inspiration on this card trying to figure out how to use this particular die.

It's easy once you realize how it works, which isn't saying much for my brain these days.  I simply used the die on two different colours - Basic White and Highland Heather.  I attached the white piece to my DSP using the Tombow glue so that I could control the amount of glue around the edges and not get things sticky.  Then, I punched out the Highland Heather flower pieces and glued them into the spaces of the white outline....sort of like doing a puzzle.  Easy peasy.

I distressed the edge with Mint Macaron and added a bit of Soft Succulent ribbon underneath.  The tone is right, it's just a bit darker than the Mint Macaron.  The focal piece has been popped up with dimentionals.

The greeting is from the Hand-Penned Petals stamp set, punched out with a circle and also popped up with dimensionals.

Finally, I have added some of the beautiful Genial Gems in the centre of the flowers.

Can't wait for the flowers to appear in the garden.  They are starting to grow, but it will be a while yet.  We've had such a wonderful April that it's hard to wait until May to get into serious gardening.  But I'll be patient and the still sleeping bugs will be happy for it.

That's all for today, thanks for stopping by,

Joan

Tuesday, April 20, 2021

Hand-Penned Thanks


Today I took progressive pictures as I created this card because the Hand-Penned DSP is so pretty it works by itself.  This is the final result - I've stamped the floral image and used the "colouring" stamps to fill in the flowers and leaves using Mint Macaron, Blushing Bride and Pale Papaya.  Once I die cut this image out, I used a black oval as a mat so that the flowers weren't lost on the background.   I chose to stamp the greeting right onto the DSP which is the backside of this background.  Finally, the little flowers have been die cut in Pale Papaya and attached with black dimensionals - which show through the little holes.

Here is the beginning of the card only using the DSP.  You could use all of the papers in the package this way.  They all have a floral image on one side and a subtle single colour design on the back.

I didn't have to use the little flowers as embellishments either - the card works perfectly without them.  I may still have put some bling on if I hadn't used the flowers.

This stamp set, dies and DSP along with a coordinating package of jewels will be available individually or as a Suite once the New Annual Catalogue goes live on May 4, 2021. 

Thanks for dropping by today,

Joan

Saturday, April 17, 2021

One Recipe, Two Cards

I had a team meeting this past week and challenged them with a card recipe.  I also challenged them to make a horizontal and vertical layout with the pieces.  I played along with them and although I got a bit frustrated with having only two squares to work with, managed to figure out two cards using retiring DSP.

The recipe included : Card Base 8 1/2" X 5 1/2",  a mat 4" X 5 1/4", two squares measuring 2" X 2", a greeting, and some sort of embellishment.

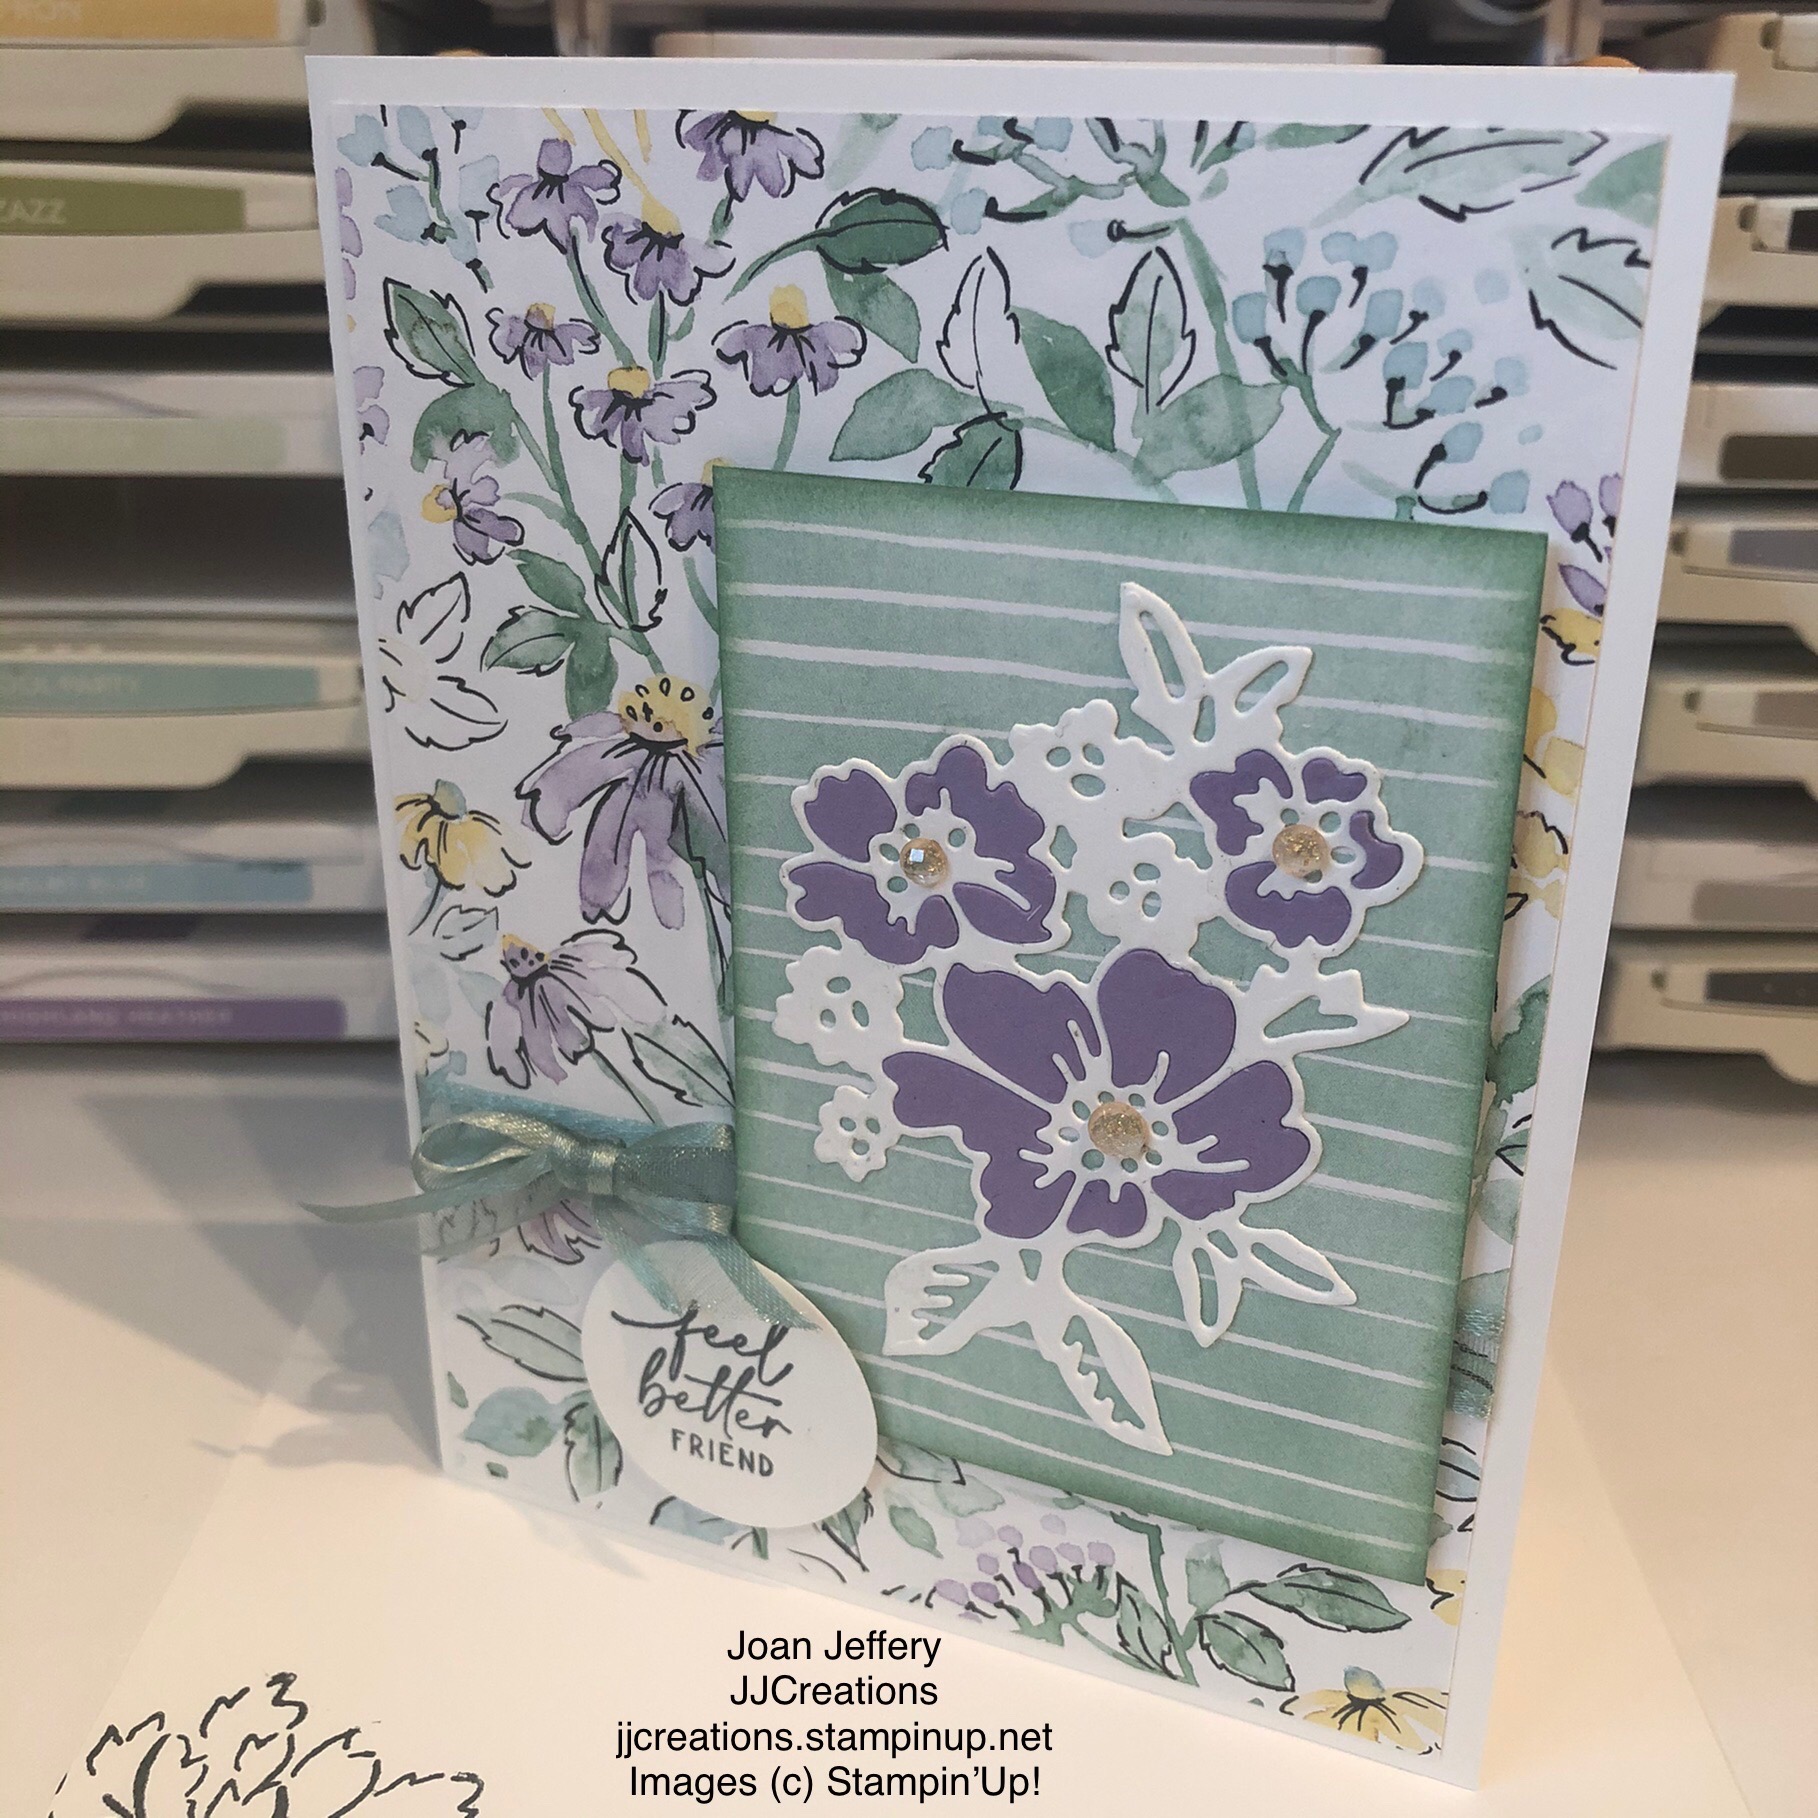
For my first card I've used the True Love DSP.  I fussy cut the flowers out of the DSP and coloured them with the new Pale Papaya and Soft Succulent and the centre is coloured with Daffodil Delight.  I don't have the Stampin' Blends in these colours yet, so I've just used my Stampin' Markers.  The greeting from this card is from the new  Hand-Penned Petals.  I love the handwriting in this set.  I've actually added another piece to this card - The black mat is what I specified in the recipe, but the DSP measures 3 3/4" X 5". The flowers and the greeting have both been raised with dimensionals.


I went a bit overboard with the gold accents on this card but I like it.  Again I've added an extra mat so the Gold Foil measures 4" X 5 1/4" and the DSP measures 3 3/4" X 5".  Because I also matted the squares, the Gold Foil pieces for them measure 2 1/8" X 2 1/8" - I didn't want them to add a lot of extra size to the pieces.  The squares have been distressed around the edges using sponge daubers and Garden Green ink.  The little gold sprigs come from the Forever Gold Specialty Designer Series Paper.  Finally, the greeting comes from the Forever Fern stamp set, has been embossed in gold and is on one of the Rectangle Stitched Framelits

The Designer Series Paper for both of these cards (including the Forever Gold Specialty Paper) is retiring at the end of the month.  So get them before they run out.  Also, remember that the Clearance Rack was refreshed with products.  

I've been working on refinishing a coffee table with my daughter.  We sanded it down yesterday in the sunshine and are going to continue working on staining it today  - in the sunshine.  Temperatures drop again tomorrow, so we take the heat and sun while we can.

Hope things are sunny in your corner of the world.  Thanks for dropping by!

Joan


  SAY  GOODBYE TO SOME  STAMPIN’ UP!  FAVORITES PLUS BIG DISCOUNTS ON SELECT PRODUCTS!  

Check out my website store and SHOP ON-LINE NOW.  Products are while supplies last so you don't want to miss out on something you just have to have.  Use this month's  Host code below when you are checking out to get your name put into a draw to receive a gift from me.

2CGY4HYF

SALE LASTS FROM MARCH 24 - MAY 2, 2021

WHILE SUPPLIES LAST!


Wednesday, April 14, 2021

Quiet Meadows In-Colour


 Today I am using the new Quiet Meadows stamp set with coordinating Meadow Dies and I have managed to use all five of the new In-Colours.

There is only one tall floral image in this stamp set but there are lots of silhouette dies which is what drew me to this Bundle.  I've only used one of the dies here, but I flipped it for a mirror image.  Lots of possibilities.  The floral image was stamped with Memento Tuxedo Black with the flowers coloured in with Fresh Freesia and the leaves with Soft Succulent.

The base of the card is Fresh Freesia with a mat in Soft Succulent.  I have stamped the distressed words onto Basic White with the Evening Evergreen and cut the two silhouettes out of the Evening Evergreen also.  The greeting has been stamped in Pale Papaya and I slipped some of the matching ribbon through the tag.  Finally, the butterfly has been die cut with Polished Pink and a matching jewel is used for her head.

I tried using the Stamparatus for stamping the distressed words, but couldn't wrap my head around it.....so I pulled out my retired Stamp-a-ma-jig to line up the blocks of writing.

That's it for today. We've got gorgeous spring weather here today - soon the meadows will be blooming.

Thanks for stopping by,

Joan

Tuesday, April 13, 2021

Birthday Jar of Flowers

I started this card yesterday while I was waiting for alcohol to dry; thought I better finish it before I play with the new products I received as Happy Mail yesterday.  But more about that later.

All of the products used for this card are being carried over to the New Catalogue.  Yay!  Designer Series Paper rarely gets carried over, but the In Good Taste package is, and I'm glad.  I love the tiles, bricks and wood textures in the series.  So, I've used a piece of the tiles as a background for my card.  Paired with the Highland Heather card stock it almost looks purple-ish.  

The flowers have been stamped with Memento Tuxedo Black and coloured in with Stampin' Blends....Daffodil Delight, Flirty Flamingo, Highland Heather, Light Pumpkin Pie and both shades of Granny Apple Green.  I fussy cut the flower section out and used the coordinating jar punch.  The little greeting comes from Many Messages and the coordinating Messages Die.
 

Jar of Flowers - 152515 - $31.00
Jar Punch - 152703 - $24.00

I mentioned that I received some Happy Mail yesterday  - I got my Pre-Order of products in the New Catalogue.  WooHoo.  And since I finally have the supplies I can introduce the new In-Colours for 2021-2023.

Which ones do you think will become your favourite?  I'm leaning towards the Soft Succulent and Pale Papaya.  They'll even work well together.

And, I'm loving the coordinating ribbon and jewels.  I'm a bit disappointed that I didn't order the Stampin' Blends, but there's always a next order.

And a final bit of news......the Clearance Rack has been refreshed with more products.  I took a peek at it and there are lots of Christmas supplies available.....WHILE SUPPLIES LAST.

You can shop at my on-line Store HERE.  To have your name put into a draw for a gift from me - remember to use the April Host Code, noted in the sidebar, when you are checking out with your order.

That's it for today,  Thanks for dropping in.
Joan


Monday, April 12, 2021

Playing with Alcohol and Stampin' Blend Markers


Today I played with my Stampin' Blends markers and rubbing alcohol.  I've done this before on a previous post, but today I have included some photos to show the steps.  I chose to use the Dandelion Wishes stamp set because of the transparent images.  That way they didn't take away from the background.  This stamp set is on the retiring list.

My supplies were a piece of Vellum Cardstock, the largest Water Painter (empty of water), Stampin' Blend Markers in Dark Highland Heather, Dark Balmy Blue and Dark Pool Party, and finally some alcohol, at 99%USP, in a small container.  The higher percentage the better.

I added colour to the Vellum with the markers.  I went to the edge of the cardstock this time but you don't have to since the colours do spread.  I also overlapped the colours a bit making sure that I was working from the lightest colour to the darkest.

Next, I picked up some alcohol with the Water Painter and began dabbing it onto the coloured sections.  You can see in the photo above that the ink responds right away.  Continue adding alcohol to the brush and dabbing on all sections until the colours react.

You'll have inks blending together so you want to make sure that you have used colours that compliment each other and don't turn into brown mud.  While the surface is still wet you can pick it up and tip it to make the colours run together more or move to a different section.

Even if you have moved the ink around, you won't know what you've ended up with until the alcohol has dried and this doesn't take too long depending on how much you've used.  If you are happy with the end result go ahead and finish your card.  I generally use too much alcohol and end up diluting my colours so I add more.

To add more colour in the lighter sections, just colour with the Stampin' Blends to fill them in.

Repeat the process with adding alcohol with the Water Painter, letting it dry, and adding more colour as needed until you end up with the result you want.

I added ink two more times until I ended up with the above background. 

To finish off the card, I stamped the images and greeting with Versa Mark and used Black Embossing Powder.  I love my Black embossing powder and will continue to use it until it runs out.  I'm sad it's no longer in the catalogue.  Anyway - I like how bold the images are when embossed.  I did use the embossing buddy prior to embossing!  I didn't want to take the chance of any extra black adhering to the edges of the colours.

The background has been attached to a piece of white cardstock using Mini Glue Dots.  I chose white, but you can try different colours to see which effect works best for you.  The base of my card is Pool Party.
And that's all there is to it.  It's a fun technique but you have to be patient with the colours and let them do their thing.  You will never end up with two pieces the same which is half the fun!

That's all for today - I hope the photos and explanations are of help to you.
Joan

Dandelion Wishes - 151345 - $27.00