Monday, December 31, 2018

Birthday Balloons

 Balloons can be so much fun.  Especially when they're so easy to make with the Balloon Bouquet Punch - you get two sizes too.

I had a bit of a hard time deciding how to arrange this card.  I punched out some cardstock balloons and inked up the stamp using the markers for the above card.  I thought that it needed a DSP background to ground it a bit.
However, I like these polka dotted balloons - they're quite fun, and they do okay flying through the middle of the card.  Both cards are super easy to make so let me know which one you would prefer to do at the January Birthday Stack.  Details about the stack will be coming up soon.

Thanks for stopping by today.
Be safe tonight if you are celebrating the coming in of the New Year.

Best wishes to you for 2019.
Joan

Sunday, December 30, 2018

Masculine Birthday Options

 It can be difficult to make more masculine type cards sometimes, but the new Classic Garage Suite in the upcoming Occasions Catalogue helps take care of that with the Geared up Garage stamp set, the coordinating thinlits, DSP and ribbon.
Now, which one would you prefer to create at the January Birthday Stack?  Let me know.

Thanks for dropping by today,
Joan

Saturday, December 29, 2018

More choices to make...

 I'm still working on getting cards ready for the Birthday Stack in January and I'm asking for input on which you prefer.  Both of these are fairly simple and both would involve you being able to choose the papers.  On the above card the "Hooray" is embossed in gold with the gold thread accent.
This punch is so fun to use with Designer Series Paper.  The sentiment is stamped and the little gold Metallic Pearls are used as the accent.

Let me know which you prefer.
Thanks for visiting,
Joan

Friday, December 28, 2018

Experimenting with Calla Lilies

 I enjoyed experimenting with colours using these Calla Lilies from the Lasting Lily stamp set.  This set is one of the FREE Sale-a-bration sets when you make a $120 purchase.  Remember Sale-a-bration begins January 3.
I came to the conclusion that the lily stamp works best with colours that are a bit brighter or darker.  That way the veins in the petal show up.  For this above card I also included some of the ribbon from the Organdy Ribbon Combo which is a FREE Sale-a-bration choice with a $60 purchase.  It's nice that Stampin'Up! includes more than just stamps in the Sale-a-bation offers.

Thanks for dropping in...
Have a great day,
Joan

Thursday, December 27, 2018

Florentine Birthday

 I'm still busy creating designs for the upcoming Birthday Stack in January.  And....I'm still creating two of each design to let people vote on which one they'd prefer to have in the stack.

This card uses the Florentine Thinlits available in the Occasions Catalogue January 3, 2019.  There is a stamp set that coordinates with it which allows you to stamp inside each of the spaces in the thinlit, but I only purchased the die.  It works well as a background.
For this second option, I've included a little flower beside the greeting.  So which do you prefer: clean and simple, or spruced up a bit?

Thanks for stopping by,
Joan

Wednesday, December 26, 2018

Upcoming Occasions Catalaogue Launch Class

Date: January 11, 2019
Time: 6:30pm
Where: 9505 - 86 Street, Fort Sask
Cost: $45
What you get...
  • $30 worth of product
  • 3 projects using new products
  • Entry into 3 Level 1 SAB draws
  • Entry into 1 Level 2 SAB draw
  • Entry into 1 Grand Prize draw
  • Occasions and Sale-a-bration Catalogues

Want to come? Your spot is not reserved until payment is received! $45 early bird price. After Dec 27th the price goes up to $50!
This is going to be a GREAT class with half of the attendees going home with extra swag/prizes!!
 
To reserve your spot click HERE


Monday, December 24, 2018

Happy Birthday, Gorgeous

 I'm having a Birthday Card Stack in January so I'm working on which cards are going to be included.  Both of these cards use images from the Happy Birthday Gorgeous stamp set.  I love the curly font in the letters and use this greeting a lot.  I decided it was time to play with the floral images in the set.
I will only select one of the cards to be included in the stack.....which one do you prefer: the pink or the purple?


Thanks for stopping by today.
Have a very Merry Christmas!
Joan

Sunday, December 23, 2018

Bold and Subtle Swaps

 One of the best things about being a Stampin'Up! demonstrator is being able to get "toys" ahead of time, to be able to play with them, and to be able to share and peak your interest.  These two cards use stamp sets that are in the upcoming Occasions Catalogue and are projects I made for a swap I'm doing with a group of demonstrators.

The above Bloom by Bloom set has nice bold images that work well with bold, bright colours.  I love the little coloured enamel dots that you can purchase also.

This Forever Lovely set is one of our "Distinkive" stamp sets.  The colour variation happens automatically when stamping the image.  The neat thing about this set is that the group of flowers and the group of leaves are two different stamps that work together in two step stamping so you don't have to think about where to put the images.

I have lots more to share with you before the catalogue goes live on January 3.  I'm done with all of my Christmas stuff so it's refreshing to use some new none Christmas images.

Hope you're ready for the holidays.
Thanks for stopping by,
Joan

Wednesday, December 5, 2018

Year End Closeout Sale.

 A friend asked me to make a card for her cousin’s 80th birthday. I chose to use the computer for the words and think my own grandma would enjoy the card.  I've used the First Frost stamp set which was is in the Holiday Catalogue AND will be carried over into the new year.  Yay.

The Year End Close-out sale begins today. Your opportunity to take advantage of special year-end deals on retiring and surplus items. Some items are last-chance and limited-inventory, so place your orders while supplies last! My on-line store is HERE

I'm giving a small gift to everyone who orders on-line this month AND uses the host code
9PN3A4A6

If you would like a copy of a list of all the items that are included in the sale, please contact me and I'll get it e-mailed to you.

Thanks for dropping by,
Joan 

Thursday, November 29, 2018

Falling Flowers of Thanks

I had to make a whole whack of Thank You cards this past week.  This design was inspired by Pat Tecza from Pinterest.  I liked how she took the Oh So Eclectic flower and made it fall down the card.  The sentiment that I've used is a very old Paper Pumpkin set.
I also liked how she used the thinlits to highlight one flower and the added pearls.
Because I was making a lot of cards, I opted to not add the thinlit and kept the card simpler with a band of ribbon.

Partway through attaching the ribbons I started attaching them at an angle...just to change things up a bit.
The question of the day - which one do you prefer?  Straight or angled?

Thanks for stopping by today,
Joan

Wood Mount - 143937 - $42.00
Clear Mount - 143940 - $31.00


Friday, November 23, 2018

Waterfront well wishes

This "Waterfront" set is another that I have been afraid to use even though I've seen so many wonderful cards made with it.   This set of  CASED cards was inspired by Debbie Henderson off of Pinterest.  I like how she kept the cards simple and it was a way for me to feel comfortable with the set.  I still need to do some playing around using different colours.


That's it for today.
Thanks for dropping by,
Joan


Thursday, November 22, 2018

Get well wishes

I need to replenish my get well cards in my stash, so I decided to pick a couple stamp sets and get down to business.
This "Hand Delivered" set scared me a little; I'm not sure why.  I think it was the prospect of colouring the balloons.  I decided to use my Blends to do the job because I would be able to do some shading.


This final card was inspired by Tatiana Tobin in Australia - off of pinterest.   I loved how she paper pieced the balloons using the DSP from the new in-colours.  She made a whole set, I only made one.

Hope you are feeling well, 
Thanks for visiting,
Joan

Monday, November 19, 2018

What kind of stamper are you?

When I was in Orlando for Stampin'Up!'s On Stage, they focused a lot on the three different types of stampers throughout the convention.  We were encouraged to keep the three types in mind when we designed cards for our workshops.  So, because I 'm working on next month's technique cards, I decided to create three different cards - although I'll only use one for the workshop.

The first type of stamper is the beginner.  They are new to stamping and are happy just to get ink on the paper.  So my first card is very simple,  just one layer and no extras.

The second type of stamper is the casual stamper.  This group stamps monthly or less may have some of their own products to play around with, but they don't stamp by themselves very often.  They add embellishments to their cards and may have punches but don't invest much in the hobby.

Avid stampers are the third category; crafting daily or weekly.  They usually have their own space to craft in and they are a collector.  They gotta have it all.  I would have to say that most of my stamping friends are avid stampers and, I admit,  that's the category I fall into.

Which type of stamper are you?  And, which of the cards do you prefer?  It was fun to progress from easy to embellished.

Have a wonderful day,
Thanks for stopping by,
Joan

Merry Embossing

I was playing with embossing powder this morning and this wonderful deer from the Dashing Deer set.  I love the pattern on him.  It shows up well when stamped and I'm thrilled that it shows well with embossing also.  I used two different colours of embossing powder; black for the body and silver for the antlers. 

Just a quick card post today for inspiration.  I'm now going to go check out the order I received.....it's full of new stuff from theupcoming Occasions Catalogue.  Woo Hoo.

Have a terrific day,
Joan

Sunday, November 18, 2018

Incredible Like You

Yesterday, I played around with one of the stamp sets I received at On Stage in Orlando.  The title of the set is Incredible Like You and I love the font that they've used for the focal words in each of the sentiments.
I have never tried to stamp a wreath before, and I think I did a pretty good job of keeping it from being too square. This is a two step stamping set so the two pieces of greenery use two stamps each and the flowers are two step also.  I fussy cut the flowers and popped them up with dimensionals.

Hope you're having a great day,
Thanks for stopping by,
Joan

Saturday, November 17, 2018

On Stage Make & Takes

I must say I had a fantastic time in Orlando.  Some things didn't turn out as expected, but overall it was a ton of fun and it was good to meet new friends and run into old ones. 
Today I'm sharing the make & takes that we did during two sessions.  All of the projects used products that will be available in the upcoming Occasions Catalogue that goes live in January.

For the first project above, we used pieces from the Needlepoint Nook Suite.  If you look closely at the Designer Series paper, you can see that it is made up of actual embroidered images.  I also like the on piece from the Framelit set that created the holes in the paper.
This little pizza box (3"x3") is covered with DSP from the Classic Garage Suite, and gears cut using the Garage Gears Thinlits.  I think my favorite feature of this card is the black and silver Striped Ribbon.
This card is oversized to accommodate the cards from our Memories and More Packs.  Envelopes are included in this pack of cards, which come in two sizes, so there's no worries about finding an envelope to fit.  I do like the vibrant colours in this card.
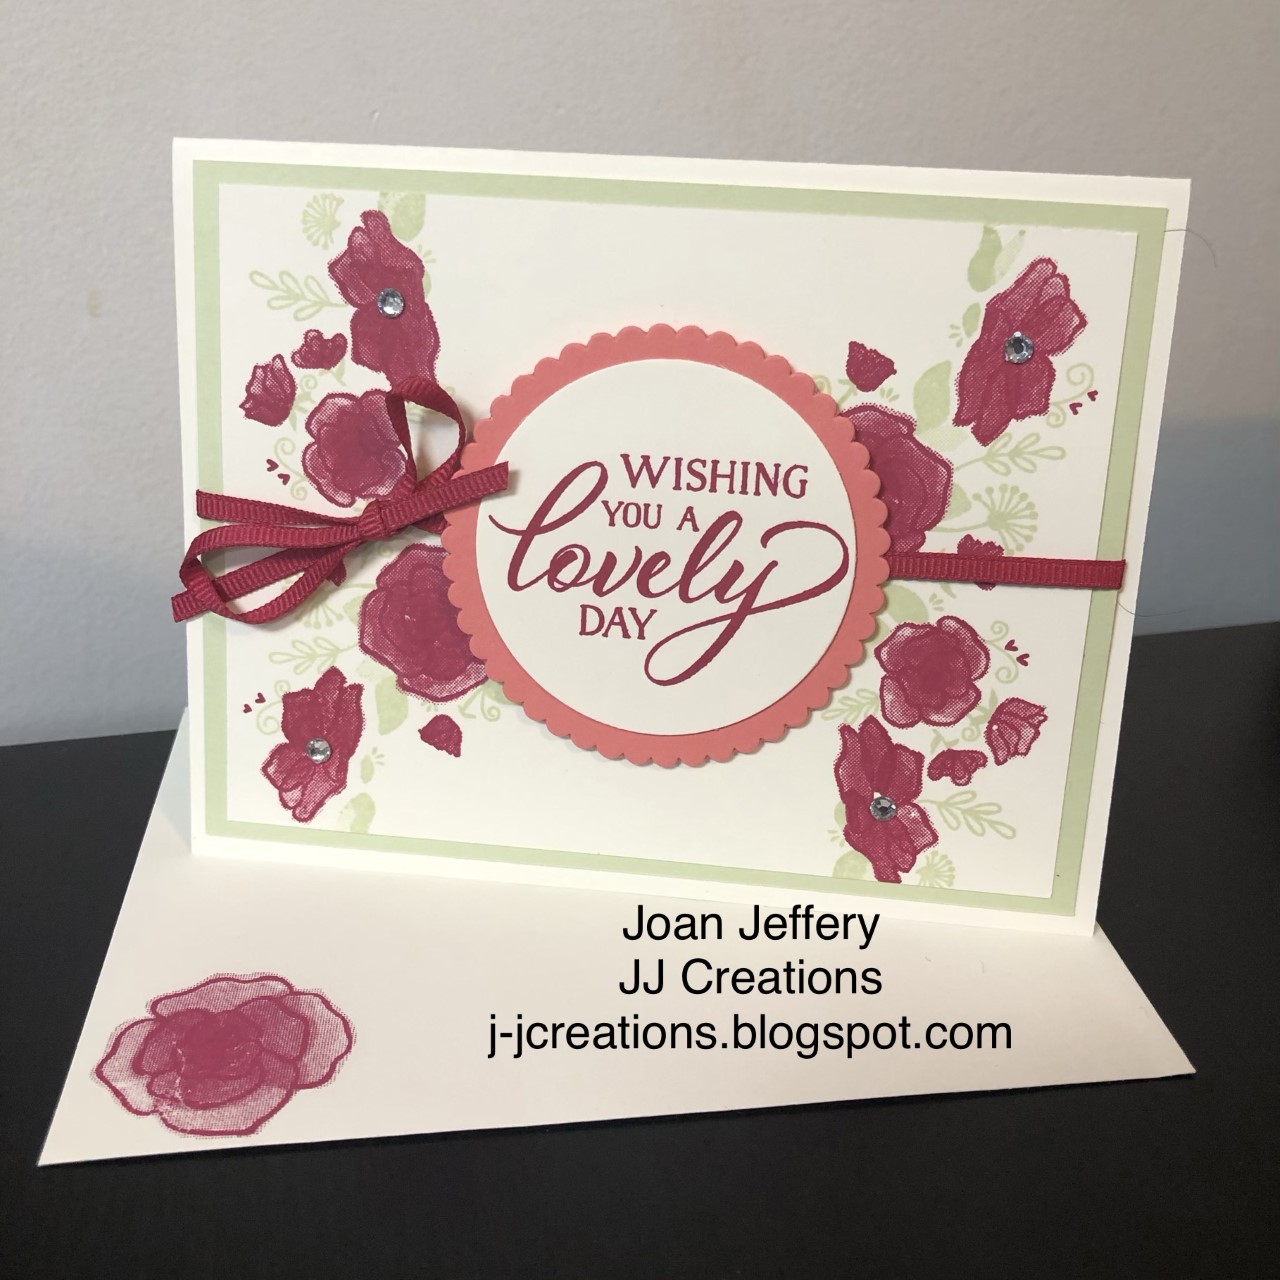
Finally a card which features products from the All My Love Suite.  Our stamp pad was a bit too juicy, but the flower stamp for this set creates variegated look in one stamping.

Now, you have to imagine about 6000 people needing to stamp these cards.  We're divided into 5 halls (or 6) making about 1000 people in each room......all needing to use the Big Shot to cut out pieces.  What do you do?  Line up a whole whack of Big Shots in two stations and hope for the best.
There are about 25 Big Shots per station, 2 stations per hall, 5-6 halls of stampers.  That's a lot of generous stampers lending their Big Shot for the event.

It was a great event with great memories.
Thanks for stopping by today,
Joan

Thursday, November 1, 2018

Snowy Chocolates

 What do you do in the wee hours of the morning when you can't sleep - get up and make snowflakes.  I used the Snowfall thinlits to decorate these chocolate packages.  And, starting today, you can purchase the products from the Snowflake Showcase.......but they are only available while supplies last until the end of November - so don't waste any time.

I love the variety of snowflakes and all of the thinlits; so many thinlits!  There are so many because some of the snowflakes come in twos so you can cut out more than one snowflake at a time!  Great time saver!  The velvet paper is great to work with too.  I've shown all the products below with the ordering numbers available for you.  At the bottom of the post is a video from Stampin'Up! featuring all the items in the showcase, so take a look at Stampin'Up!'s tips and ideas.

Enjoy your day,
Thanks for stopping by,
Joan

For my tutorial on how to make the little gusseted packages click  HERE

                                               Snow is Glistening Stamp Set149742$27 CAD
                     Neige Scintillante (French Snow is Glistening Photopolymer)149906$27 CAD

                                                  Snowfall Thinlits149692 $53 CAD

                                                 White Velvet Paper149619 $6.75 CAD

                                                    Snowflake Trinkets149620$10 CAD

                                             Happiness Surrounds Stamp Set149744$22 CAD
             Bonheur Tout Autour (French Happiness Surrounds Photopolymer)149904  $22 CAD


Tuesday, October 30, 2018

Snowflakes in November


 One of the best things about being a Stampin'Up! demonstrator is getting a sneak peak of the products that are coming around the corner.  I got to preorder this snowflake set and I'm having a lot of fun with it.   But, this set and other products become available on November 1 and are only available for the month.
Yesterday I used the ghosting technique (above) using all the individual snowflake available in the Snow is Glistening stamp set and topped it off with a wonderful flourish of snowflakes cut from the (scrumptious) velvet paper.
 Today I splashed some blue Brusho Crystal Color onto a piece of shimmery cardstock and topped it with the largest thinlit snowflake; again cut from the velvet paper.
If you love snowflakes be sure to contact me in November to get your supplies.

That's it for today,
Thanks for stopping by.
Joan

Join the Club...

A number of you have asked about my stamp club so here are the details...there have been some changes - to your benefit! I do have some spots left!

  • Commit to placing a minimum $40 (+s/h & GST) each month.
  • Monthly host code MUST be used
  • Each month one club member gets the host benefits without doing a thing
Benefits
  • Members are guaranteed a MINIMUM of $20 in free spending....to be used on any product in any current catalogue during your host month.
  • During your host month you will receive 20% off your personal order
  • There will be exclusive FREE monthly draws for products
  • Every member chooses a FREE stamp set valued at $21 or less during her host month.
  • Club members can host classes at their home, or mine, during their host month.
  • Club members receive a little "Thank You" card or gift in their order each month.
  • Club members receive a discount on some classes and events through the year.
This is an economical way to build your stamping and craft supplies!
 
If you're ready to join the club, just contact me and I'll get you set up.
 
Hope the information helps,
Joan