Tuesday, November 30, 2010
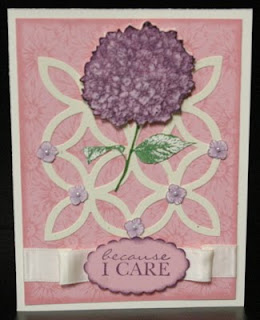
CAS Friends Forever
Yesterday I got a couple of challenges done on
this one card before delving into the scrapbooking ( and yes, I got two spreads done - one was a single page and one a double - I've left everything out so I can hopefully keep the ball rolling today!)
GRAC (Glenda's Random Amusing Challenge) - Sketch
SCS CAS95 - Flower Accents
I decided to use up some discontinued rub-ons for this card. For the flower I took a piece of Pink Pirouette, spritzed it with water and crinkled it up. After laying it flat again, I brushed it with Pink Pirouette ink and then put it through the Big Shot with the Blossom Party Originals die. I much prefer textured flowers to flat ones. For the centre of the flower I added one single large pearl and then took one of the little "strings" of pearls to encircle it. Lickety Split - you have a wonderful flower centre.
Happy Tuesday to you - and thanks for stopping by! - Joan
Stamp Set - none (retired rub-ons used)
Paper - Whisper White, Concord Crush, Pink Pirouette, Lap of Luxery DSP
Ink - Pink Pirouette
Other - Top Note Die, Blossom Party Originals die, Pretty in Pink Taffeta Ribbon, Pearls, Tombow glue
Monday, November 29, 2010
Glittery Decorations
Today I'm sharing some cards I created a couple of weeks ago experimenting with glitter and clear packing tape. We had a demonstration at a team meeting creating a "snowglobe" using this same technique, I just decided to try something different.
To create the glittery ornament:
Cut your cardstock to the size you need for the punch you're going to be using. (I can see myself doing this with the large heart punch, and the butterfly punch in the spring)
Punch the paper and add inked images around the outside if you wish.
On the BACKSIDE of the punched paper lay down a piece of clear packing tape so that the sticky side is facing the FRONT of the card.
Lay the whole piece down in a tray of glitter and press so that you get a good layer of glitter. It's so easy!
For the Rich Razzleberry ornament I added some of our new pearls - I love that we have little strings of pearls we can manipulate. I actually ended up securing them with TomBow glue so that they wouldn't pop off. The crinkley ribbon is added on top of a piece of sticky strip.
For the Old Olive ornament, I added little dots of Champagne Glass Glitter....I'm so glad this is being continued in the upcoming Mini! I also added the glass glitter along the top of the scalloped edge. This card is my "last" Christmas card of the season for my Dec 7th Technique
Tuesday class.
I'm sure I'll make a few more Christmas cards yet, but I'm looking forward to looking to new occasions in card making.
Hope you're having a marvelous Monday - Thanks for stopping by! - Joan
Razzleberry Ornament Card
Stamp Set - Vintage Vogue
Paper - Whisper White, Old Olive, Rich Razzleberry, Sweet & Sour Specialty DSP, Presto Patterns Specialty DSP
Ink - Rich Razzleberry, Old Olive
Other - Rich Razzleberry Taffeta Ribbon, Ornament Punch, Fine Cosmo Glitter, Basic Pearls, Sticky Strip, TomBow Glue, Sponge Daubers
Old Olive Ornament Card
Stamp Set - Teeny Tiny Wishes
Paper - Very Vanilla, Old Olive, Cherry Cobbler, Jolly Holiday DSP
Ink - Basic Black
Other - Ornament Punch, Fine Supernova Glitter, Champagne Glass Glitter, Scallop Edge Border Punch, Word Window Punch, Modern Label Punch, TomBow Glue, Dimensionals
Sunday, November 28, 2010
Snowman Christmas
Today's card incorporates two challenges..
Sweet Stop Sketch - Sketch
SCS Inspiration Challenge 260 - The Country Porch - I chose the dessert plates, shown in the thumbnail, from this wonderful "country" homestyle online store.
Of course, once I selected the plates, I realized that I really didn't have any snowmen in my current stamp sets - how on earth did that happen???? So - I went into my retired stash and pulled out Holiday Tag Team for this cute little guy!
I love this sketch and the paper I used could just as easily fit into the challenge over at Daring Cardmakers - using spots and stripes this week. Sock Monkey already entered that though...
Well, today is the Grey Cup Game here in Canada. So, practically the whole country is watching. My husband is at the game - having left the house with three pairs of pants on, three shirts, a heavy duty jacket, blanket, sleeping bag, gloves and mitts. I'm pretty sure he'll be warm enough. Especially since we've been blessed with a windless day. I will be in my stamping room - didn't get the scrapbooking done yesterday so have it set out ready to get to today.....I'm beginning to think I'm a bit ADD. In any case, I hope the right team wins.
Thanks for taking the time to drop by! Joan
Stamp Set/s - Holiday Tag Team (retired), Teeny Tiny Wishes
Paper - Very Vanilla, Cherry Cobbler, Old Olive, Jolly Holiday DSP
Ink - Basic Black, Cherry Cobbler, More Mustard, Bashful Blue, Peach Parfait
Other - Word Window Punch, Modern Label Punch, 2 3/8" Scallop Punch, 2 1/2" Circle Punch, Very Vanilla Satin Ribbon, Mini Glue Dots, Dimensionals, Blender Pen
Saturday, November 27, 2010
Sock Monkey Holiday
Oh I truly had fun with this card and all the paper piecing. I thought Sock Monkey deserved to come out and play for Christmas......
This card covers these two Challenges...
Just Add Ink - Sketch
Daring Cardmakers - Create a Christmas card using both spots and stripes. This Jolly Holiday DSP worked perfectly!
I used liquid applique on the Santa hat to add some fluff and glitter to the ribbon on the present. I also colored two of the teeny tiny pearls with a black Sharpie pen and used them for the eyes. For the greeting - I used my black marker to color and stamp only one word at a time so that I could have them fit into this punch - the words are from the "Many Merry Messages" set and are actually side by side.
Hope you have a wonderful Saturday - I'm hoping to get a bit of scrapbooking done.....we see - I'm so easily distracted by other things!
Thanks for stopping by!
Joan
Stamp set/s - Sock Monkey, Sock Monkey Accessories, Many Merry Messages
Paper - Very Vanilla, Cherry Cobbler, Old Olive, Jolly Holiday DSP
Ink - Basic Black, Old Olive, Cherry Cobbler
Other - Pearls, Decorative Label Punch, Fine Galaxy Stampin' Glitter, Dimensionals, sponge daubers
Thursday, November 25, 2010
Mojo Throwdown...
WooHoo, It's the weekend. I know that matters to a lot of people....Grey Cup, American Thanksgiving. I'm sort of on a perpetual weekend with this rehab....just about had enough at this point, so I'm glad that I'm managing to spend a bit more time in my stamp room!
I finally got a couple of challenges done rather than other personal stuff...gotta get back into the groove!!!!
Today's challenges.....
Mojo Monday - Sketch
Color Throwdown - So Saffron, Old Olive, Rich Razzleberry. (It's nice to get away from the fall and Christmas colors for a bit!)
We're in for some balmy weather this weekend. I've been able to get out a bit more this week into the fresh air and sunshine thanks to a wonderful friend who's agreed to be my chauffeur. I've been told by my physiotherapist that I need to wait until I have at least 90* of bend in my knee before I think about driving. Thirteen degrees to go.....gotta keep doing those exercises!!! Ughhhhh!!!!!
Anyway - thanks for stopping by - hope you have a wonderful weekend!
Stamp Set/s - Priceless, Perfect Punches
Paper - So Saffron, Old Olive, Rich Razzleberry, Whisper White
Inks - So Saffron, Old Olive, Rich Razzleberry, Versa Mark
Other - White Embossing Powder, Large Oval Punch, Rich Razzleberry Taffeta Ribbon, Pearls, Mini Glue Dots, Dimensionals, Square Lattice Embossing Folder, Big Shot
Wednesday, November 24, 2010
Color Dare 86
Oh what a fun set of colours we have for this weeks' Color Dare.....Pumpkin Pie, Cajun Craze, Baja Breeze and Wild Wasabi.
I used some of my Vanilla Shimmer Smooch Spritz. I really do need to either get the "Color Catcher" or rig something up when I use this spritz. I'm getting used to it, and am thinking I'd like to get some of the other colours.
I'm sorry that the photo turned out so "bright" - the card is a lot richer looking in person.....because these are wonderfully rich colours together - Thanks Riley!!!!
So - If you're up for the dare, be sure to link your creation to the Color Dare site - we'd love to see what you come up with, and you may be the Featured Stamper. Also, when posting to public sites remember to tag your creation with CD86. Now, take some time to see what the other members of our Design Team have come up with for this week. It's always exciting to see everyone's creative interpretations!!!
Glenda Wyatt
Heather Prince
Joan Jeffery - Me
Marisa Ritzen
Melissa Hubert
Nance Leedy
Riley Fitzgerald
Thanks for stopping by! Have a fantastic day. Joan
Heather Prince
Joan Jeffery - Me
Marisa Ritzen
Melissa Hubert
Nance Leedy
Riley Fitzgerald
Thanks for stopping by! Have a fantastic day. Joan
Wednesday, November 17, 2010
Color Dare 85
I have a clean and simple Color Dare card for this week....
the featured colours are: Melon Mambo, Blushing Bride and Pacific Point. What a change from the fall and Christmasy colours I've been using lately. I quite like this combination that Riley has come up with for this week.
I've used the "Just Believe" stamp set - double stamping the tall flowers with with Melon Mambo and Blushing Bride. The floral discs are progressively raised to the top Melon disc which has two dimensionals raising it up.
I finally pulled out my "Tiny Tags" set and punch....the tag is attached with a rhinestone brad - which may not quite match the colours for this week, but blends in.
When you've finished your creation with these colours don't forget to post it over at the Color Dare Challenge blog so everyone can see it - and you could become our featured stamper. Also remember when posting on public sites to label your creation CD85. I hope you play along!
Now, take the time to see what the other design team members have come up with for this week....here are their links....
Glenda Wyatt
Heather Prince
Joan Jeffery - Me
Marisa Ritzen
Melissa Hubert
Nance Leedy
Riley Fitzgerald
Thanks for stopping by - Have fun Stamping!!! Joan
Heather Prince
Joan Jeffery - Me
Marisa Ritzen
Melissa Hubert
Nance Leedy
Riley Fitzgerald
Thanks for stopping by - Have fun Stamping!!! Joan
Sunday, November 14, 2010
CAS Elizabeth
A quick Clean and Simple card today - I used this one this past week for a workshop and will most likely use it for some cards at church too....
I received the prototype from a stamping friend in the form of a get well card. She used the flowering branch from "Thoughts and Prayers". I hadn't used this Elizabeth stamp yet and thought it worked quite well.
Thanks for stopping by - and I hope you're enjoying your weekend.
Joan
I received the prototype from a stamping friend in the form of a get well card. She used the flowering branch from "Thoughts and Prayers". I hadn't used this Elizabeth stamp yet and thought it worked quite well.
Thanks for stopping by - and I hope you're enjoying your weekend.
Joan
Saturday, November 13, 2010
Reflections and Shadows
At our last team meeting we did a mirroring technique using vellum. By stamping the image on one side of the vellum, flipping it over and restamping, you can create a mirrored (reflected) image quite simply. We brayered the vellum with the Night of Navy ink before stamping the image, and this creates a wonderful night scene.
One of my fellow stampers, Tamara Bertram (Tamara's Paper Trail) found an alternative method to this which I also tried and used at a workshop I held this week. After stamping the image on the piece you're using for your card, you can create the shadow using Tamara's instructions...."... I stamped the image on the clear image sheet from my Stamp-a-ma-jig and then turned the SAMJ over to "blot" most of the image off on a scrap piece of paper. Then I pressed the image sheet onto my card to transfer the light image."
I love how this turned out because it's more like a sunlight shadow than and evening reflection. You should check out Tamara's creation because she has created a wonderful "shore" where the image and shadow meet.
We have no snow yet - temperatures are a bit nippy, but I'm thankful I'm not having to manoeuver through snow yet.
Hope you're having a wonderful day - Thanks for taking time to stop by - Joan
Friday, November 12, 2010
Cased but changed....
In this past month's Stampin'Success Magazine there was a beautiful banner created by Jodi-Danielle Kutz from Sarnia, Ontario. I really liked her creation and decided to case it, but change it a bit. I
created the focal images using Staz-On ink on watercolor paper and, using markers with an aqua painter, coloured in the images. I'm afraid of watercolor, but I found this quite easy to do and was able to play with the images until I got them looking the way I wanted.
Jodi-Danielle's creation was a banner to be hung up - I don't have places for that to occur, so I used the Top-Note die to create an accordion style project that stands up. I think it will work well standing across the top of our piano.
Once again, I have used the Northern Frost Decorative strip. I am so glad I invested in these snowflakes....I have used them a lot this season and dearly hope that they end up in the catalogue next year. The letters are retired sticky letters - it was good to put them to use!
I hope your Christmas preparations are beginning and coming along well. To be honest....this is as far as I've gotten so far.
Have a wonderful day - thanks for stopping by. Joan
Wednesday, November 10, 2010
Rudolph & Friends
Another Color Dare Wednesday!!!! This weeks colours are Pear Pizzaz, Night of Navy and Soft Suede.
When I get these fabulous combinations from Riley - our Color Dare Leader - I grab scraps of each colour and either go with the season/celebration that the colours make me feel....or I look through my own "catalogue" of the stamps sets I have and see which set jumps out at me to use the colours with....well , for this combo these little fellows yelled, "pick me, pick me"!!!
Be sure to head on over to the Color Dare blog to post your creation with these colours - and if you are posting on a public gallery be sure to label your work with CD84. Now, please take some time to venture over to the other Design Team members' blogs to see their wonderful creations - I'm always so impressed!
Here's hoping you have a wonderful Wednesday! Thanks for stopping by! Joan
Saturday, November 6, 2010
Snowy Penguin
I feel bad that I haven't gotten much blogging done this past month.....I've been getting some necessary Christmas stuff done in my stamping room and beyond that I can't sit in my chair for too long at a time....not only does my knee end up aching, but my ankle swells up too....so I have to keep my stamping time to a limit. Otherwise, the knee replacement recovery is coming along not too bad.
I did manage to print off some challenges at the beginning of this past week and this little guy covers the Mojo Monday Sketch and an old Play Date Cafe challenge....the Play Date colors from a week ago were black, white and burgundy.
I absolutely love this snowflake die for the Big Shot - the snowflakes are so delicate and you get so many at one shot.
The snow we did get in October has disappeared and we have been able to enjoy some incredible warm fall temperatures here. Hope you are enjoying fall in your part of the world too....if you're in the fall hemisphere!
Thanks for stopping by - have a fantastic Saturday. - Joan
Wednesday, November 3, 2010
A Perfect Blushing Garden...
It's another Color Dare Day and I found these colours so gentle together....Garden Green, Blushing Bride, Perfect Plum and Very Vanilla.
I tried a technique that I spotted in one of our recent "Stampin' Success" magazines for the blossom of this flower. I wet down a piece of watercolour paper and stamped the flower image in Blushing Bride - classic ink. Once that piece was dry - and the blushing bride colour had bled a bit into the paper, I topped it by restamping the image in Perfect Plum on the dried paper. The tiny bit of pink shows through the blossoms. I then cut out the whole blossom and raised it on the card.
I am loving the self adhesive pearls that we have right now...especially these teeny tiny ones I used in the centres of the tiny blossoms. The yummy Vanilla satin ribbon folds nicely along the bottom!
I hope you have fun with these colours, and once you have your creation, don't forget to post it at The Color Dare for everyone to see. Also, when you post on a public gallery, be sure to label it CD82. Finally, if you haven't seen what the other members of the Design Team have come up with this week, make sure you pop over to their blogs to check out their creations.
Thanks for stopping by! Joan
Subscribe to:
Posts (Atom)