Showing posts with label Punch: Itty Bitty Shapes. Show all posts

Thursday, June 7, 2012

Ducks, Dinosaurs and Butterflies

I must say, my opinion of Summer Starfruit is beginning to change a bit.  I wasn't enamoured with it when I first saw it, but as I'm working with it, it's growing on me! 
The sketch for the duck card is from Create with Connie and Mary.  I decided I wanted to use the "Cherish Friendship" set because it's been neglected - and then I wanted to find an idea for colouring the duck.  Stampin' Connection (a website available to Stampin'Up! Demonstrators with loads of ideas and inspiration) came to the rescue and I took some inspiration from Sandy Mathis who had bleached the duck last June.  
So - I used the same Crumb Cake paper, stamped the image with Black Staz-On and then took an aqua painter dipped in bleach to colour in the duck.  Once I die cut the image with one of the Apothecary Accents Framelits, I took a sponge dauber with bleach to go around the edges and added some Cajun Craze after that.
The "gingham" piece is Very Vanilla put through the Stripes embossing folder in two directions - the embossing folder was brayered with Crumb Cake first each time.

Since I had the brayer out, I decided it was time for me to try out one of Michelle Zindorf's tutorials.  

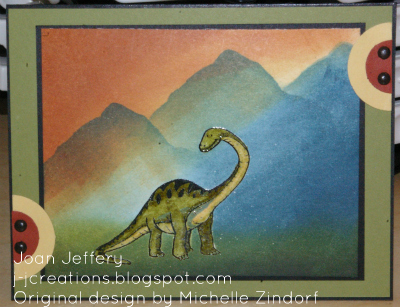
I've cased her card pretty much exactly as she created it - except I need a WHOLE BUNCH of practice using the brayer so that I don't end up with straight lines.  
I learned two things making this card - 
1 - if you're real quick, you can add (clear) embossing powder to Classic Ink.
2 - In order to keep the dinosaurs' "true" colours while you brayer the background, you colour him with VersaMark Pen and add clear embossing powder so that he becomes a embossing resist.  Duh!!!  Fantastic idea.

Since I was on a role, I cased another of Michelle's cards.  I saw this card a couple of weeks ago, and thought it would be a good tutorial to start with.  She gives such fantastic, step by step, instructions.  The images were coloured with the AquaPainter using ink from the lid of the Ink Pad.  I think what I learned most - which I need more practise with - is the use of different colours to produce shading.  Next I'll have to create something of my own using the new things I've learned.

So - it was a productive afternoon - on top of doing 3 loads of laundry - and folding it....on the SAME day...WOW!

Hope your day has been filled with inspiration.  Thanks for stopping by!
Joan

Saturday, March 31, 2012

Spring is in the Air


As soon as I saw the challenge at Stampin' Royalty - "Spring Things", I knew I had to get busy with the project I had planned.....I was inspired by the photo on page 5 of the April Stampin' Success Magazine. 

 I have put this bird cage at our front door for the past two years.  Sometimes it's empty; last year I stuck a chickadee inside (ceramic of course).  When I saw the example in the magazine I knew I had to duplicate it.  I literally had to cram in  the wreath I used as a nest, and the eggs are drastically oversized, but I'm happy with how it turned out.

I've been using pearls or rhinestones as the bodies of my butterflies, but I like the added flowers too.  Linen thread was used of the antennae....it worked well.

The styrofoam eggs are covered with layers of the Blossom Bouquet Triple flower and then spritzed with Soft Suede.  I moistened the paper a bit to make it more pliable, and attached the layers with a hot glue gun.

These little flowers are standard....the Boho Blossoms punch - largest blossom in 5 layers.  Each layer was spritzed with water first before crumpling it up.  I used sewing pins through the middle to hold them together.

Finally, I used the left over butterflies for a card using the sketch from Stamping 411.

I've been babysitting Elliot the past three afternoons while his mom and dad get moved into their new place.  I'm bushed!  But I had a good time.

Hope your weekend is off to a good start.  Thanks for taking the time to visit.
Joan

Friday, July 22, 2011

Royal Birthday Mash Up

I got to use my new "Creative Elements" set today for two Challenges.  I used the sketch from Stampin' Royalty and the colours and theme from The Friday Mashup!
  • use the colours Not Quite Navy, Always Artichoke, Cherry Cobbler, and Sahara Sand
  • create a Birthday Card
I created the background piece first stamping the initial image with the Not Quite Navy and then colouring sections in.  I used ink with an aqua painter on regular paper, so some of the outside edges bled a bit, but that just added some age to the piece.

For the flower I stamped the image on watercolour paper three times using the Cherry Cobbler and then used a blender pen to pull colour into the open sections.  I cut all the flowers out getting progressively smaller and layered them with dimensionals (you can't really see the dimension in this photo).  I'm not altogether happy with the way the flower turned out.  There's almost too much colour - I'll have to play with it a bit.

The centre strip of Sahara Sand was put through the Big Shot with the new Stripes embossing folder - but it's hard to see the embossing in the picture.

It was a good day for stamping because it's been moving between misting and pouring all day.  Hope your day has been productive too.

Thanks for stopping by!
Joan