Showing posts with label Techniques. Show all posts

Sunday, February 5, 2012

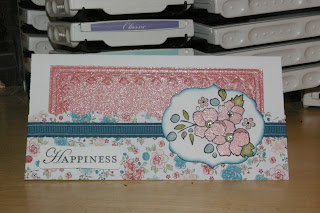
Final Spritzing

I had a fantastic day yesterday stamping with friends at the Extravaganza.  Lots of wonderful projects I'll share over the next few days - but today I'm showing the last two projects from my demonstration.  I used the Blushing Bride Smooch Spritz using the sketch from Freshly Made Sketches for both examples.

For the card above, I took two of the paper daisies and "painted" the Smooch Spritz onto them with the Aquapainter.  What a wonderful effect - the petals take on the shimmer of the spritz.

Finally - I used the last "technique" suggested in the January Stampin' Success Magazine - "Direct and Deliberate".  That's exactly what I did - spritzed the piece of Blushing Bride card stock until there was no original card stock unspritzed.  Glorious Shimmer!  I  also painted the flowers, from the Bordering on Romance set, with the smooch.

So that's it for spritzing - I'm excited to see what's coming up for the Summer Smooches Suite later this spring.  Now I turn my attention to preparing for a booth at an upcoming Teacher's convention.  
Fun, fun, fun!  Can't wait!

Hope you have things to look forward to in your near or distant future!  Thanks for stopping for a visit.
Joan

Friday, September 30, 2011

Fall Brad Mashup!

 Well, I'm sad to say that this is my last posting as a guest designer for the Friday Mashup!  I have thoroughly enjoyed my opportunity to work with these talented ladies.  The mashup is a fun concept and I will continue to work on these weekly challenges!  So - for this final Friday of September the mash up, which is a Fan Favorite Pick created by Lisa Runyon, is:
  • Make a "Fall themed" project
  • Or Make a Project that uses "Brads...lots and lots of Brads".
  • Or "Mash it Up" and create a fun "Fall themed project that uses lots and lots of Brads".
One thing I love about fall beside the crunchy leaves on the ground, are the Black Eyed Susans which come into perfect bloom at this time of year.  I walk past a yard which has a whole bed full of them, and some other little groupings scattered around in other beds.  I smile each day I pass and see this one little grouping, standing tall and unwilted while the other plants around them are beginning to fade.  They're just so happy looking.  So - they were my inspiration for this card - and I chose to use brads to highlight the "eyes".

The Crochet Trim has been changed up a bit.  At the Regionals I was at two weeks ago, one of the home-office demonstrators showed how to colour the trim with ink.  You need to wash it out a bit first to remove the chemical that is on it - otherwise the ink sort of beads on top of the fibers.  I just rinsed the trim out with a bit of handsoap, dried it with my heat gun and then applied the ink from the ink pad with a sponge dauber.

Be sure to head over to The Friday Mashup! to see all the FALL-icious cards the DT have come up with.  Be sure to link your own creation to that blogsite and when posting on a public gallery remember to use FM26.

The last two Saturdays have been spent at Stampin'Up! events - now tomorrow I'm attending an Orff workshop.  Should be full of musical fun, fun, fun.  Hope your weekend is gearing up with things to look forward to.  And thanks again to Holly for the opportunity and privilege of being a guest designer for September!

Thanks for stopping by,
Joan

Thursday, September 1, 2011

Floral Filler Butterflies

It's amazing what you discover when you use something properly!  I have used this Fancy Fan Letterpress plate a couple of times on previous cards, but I neglected to put in the impressions pad.  I'm not sure why I thought of it today, but image my surprise when I ended up with a totally different result!  Duh! The areas without ink are raised ever so slightly.  I had liked the effect I was getting before - so now I have options.

Today's colours are from Create with Connie and Mary.  I wasn't sure what direction I was going to go in with this combo; there are so many possibilities.  The colours are Rich Razzleberry, Lucky Limeade, and Pumpkin Pie.  I saw Halloween, Fall, last take at Summer - totally cool combo!

Initially when I embossed these glossy butterflies with the Floral Fillers I thought I'd swirl each of the colours on them as we do with the embossing resist technique; but I opted for leaving each level it's own colour and like how it turned out.  The little banner is cut from the Petal Cone die.  I distressed the paper fibers by pulling the Bone Folder over it like you do to curl ribbon.  That made it easier to "billow" across the bottom.

I can't believe tomorrow is Friday already - this week has gone by quickly - amazing what going back to work does to time!  Be sure to check back tomorrow - I've been keeping a secret and am so excited I can finally tell tomorrow!

Thanks for stopping by today - Hope your September is off to a great start!
Joan

Monday, May 23, 2011

Mojo full of Butterflies


The last number of posts I've had, have been scheduled while I was away in Edmonton to stay with my husband while he attended meetings for the Alberta Teacher's Association. It was a nice little holiday - not far from home!!!! The two of us were also able to attend a "Parent's Barbeque & Party" held by my son and his housemates. They had awesome food, and most of the parents and siblings of the 6 housemates got to meet. It was a very nice evening - a perfect way to end the weekend. So - I came home and went right to my stamping room to see what challenges were at hand and found myself using mostly butterflies....

I tried my hand again with the Faux Mother of Pearl again - using a butterfly die. I've ordered some white Shimmer Paint - so I can't wait to see what this technique will look like with that. I am pleased with the butterflies although I forgot to use glossy paper - it's just regular Whisper White cardstock.
The challenge for this card was a Sympathy card for Raise the Bar. I've also used the Frayed Ribbon technique from Stamping 411's How-To Wednesday. The frayed ribbon made for a different body on the butterfly.

I used a leftover background piece on my Mojo Monday Sketch card - I had embossed the Baroque Motif in white and put it through the Big Shot with the Square Lattice Embossing folder. It didn't end up working for the card I was working on back then, so I kept it on my desk to remember to use it. I didn't realize, until it was together, that the leaves in the Baroque background and the leaves on the butterfly match. I must say I think there is something missing on the card, but I'm not sure what. Any ideas!

Well, we're in to a short week now - and the long haul until the end of the school year. I'm hoping to remain sane until my spring concert is over! Now that the leaves and blossoms are out I know it will add to my sanity!
Hope things are blooming for you - and thanks for taking the time to stop by for a visit. Joan

Saturday, May 14, 2011

Awash with Orange


Thought I would give this stamp set another try. Thursday night I came across a blog with this technique and for the life of me I couldn't find it again today. It used the Shimmer Paint - I used the Champagne because it was the only colour I had, but on the explanation she used Pearl - to give it the Faux Pearl look. On Beate Johns tutorial HERE she used white acrylic paint. I think I have a few too many globs of shimmer paint - I will try this technique again though.

Thanks to Kerin, I found the tutorial for this technique - which I had seen on Thursday - over at Stamping 411 - so HERE is the tutorial they have. Both 411's and Beate's are easy to follow. Give it a try.

The sketch today is from Stamping 411 and the colours are from Raise the Bar - {Green} Apples and Oranges.

Hope you're having a productive Saturday - we've got wind back here again - makes it a bit difficult to get things done outside.

Have a great day - and thanks for dropping by for a visit. Joan

Stamp Set - Awash with Flowers, Inspired by Nature Paper - Peach Parfait, In-Colour Patterns DSP, Whisper White, Tangerine Tango, Glossy White Ink - Tangerine Tango, Pumpkin Pie, Peach Parfait, Old Olive Accessories - Pear Pizzazz Seam Binding Ribbon, Basic Pearls (coloured with black Sharpie), Champagne Shimmer Paint, Blossom Bouquet Triple Layer Punch, Dimensionals, Glue Dot

Tuesday, February 1, 2011

Rose Linen

Here's a card I completely cased for my upcoming Technique Workshop. The original is in the January issue of Stampin' Success Magazine. I've changed the colours, paper and embellishments.

I'm using the Faux Linen technique - sanding the "gloss" off of the glossy white paper and adding ink to highlight the lines.

I've had a very enjoyable low-key birthday today - it's been just wonderful!

Hope your day has been enjoyable too! Thanks for stopping by!

Tuesday, January 25, 2011

Extravaganza Cards

Here are two of the cards we did this weekend at our Team Extravaganza. What a ton of fun we had and we were totally spoiled with the number of projects (cards, scrapbook pages, mini scrapbook and Valentines) we were able to create, plus a terrific lunch!

The first set of cards we worked on were basically cards which could be done easily at a class - but still have Wow factor!

The Espresso and Craft card used the Embossing Resist technique; but we used Whisper White paper and not Glossy.

For the second butterfly note card, we used pastels and a blender pen to colour in the butterfly.

Tomorrow is Color Dare day, so I will share more of our
projects on Thursday.

As I'm posting this, I have my son and two of his friends shoveling the snow off our roof - I hate to admit that I said ......"Don't do something stupid until I get into the house so I can get a better shot." Thus spoken before they did flips off the garage. Oh to be young again!!!! Although I never could do a back flip!

Hope there is sunshine and safety in your life today. Thanks for stopping by. Joan

Friday, January 14, 2011

Nature Walk with a Friend

Here's yet another Nature Walk Card.....

I stamped "En Francais" onto glossy white paper with Early Espresso ink. Then I took a scrap of sand paper to create the Faux Linen, and sponged some So Saffron onto it. Followed up by stamping the foliage from Nature Walk.

I added a line of sticky strip and then scrunched up the Cherry Cobbler Seam Binding Ribbon onto it. I love how easy it is to work with this ribbon.

Finally, I took one of the new Vanilla Rosettes from our Occasions Mini and colored it with the So Saffron marker.

The hardware, unfortunately is from the retired Hodgepodge hardware set.

I planning to spend a lot of time in my stamp room this weekend....it's suppose to be snowing, so it will be a great place to hunker down. Hope you have a fun filled weekend planned.

Thanks for stopping by! Joan

Stamp Set/s - Nature Walk, En Francais, Your a Gem
Paper - So Saffron, Old Olive, Glossy White
Ink - Early Espresso, Old Olive, So Saffron
Other - Cherry Cobbler Seam Binding Ribbon, Sticky Strip, Vanilla Rosettes, Hodgepodge Hardware (retired), small Oval Punch, sponge dauber, Mini Glue Dots

Thursday, January 13, 2011

Linen Butterfly


I know I've been using this "Nature Walk" set quite a bit lately....and I'm not finished with it yet. I'm creating a number of different projects with the set for a display that will be up at our Extravaganza on January 22. I do, however, have to stop making cards, and move on to some different types of projects....this weekend.
I picked this stamp set to feature because I do like it a lot. I'm also doing a short and sweet demo on how to do the Faux Linen technique - so I've been doing a lot of that too!!! For this card, I scratched the glossy paper with sandpaper, and then used craft ink to stamp the butterflies and sealed them with clear embossing powder. Once dry, I sponged the Marina Mist onto the background and dabbed So Saffron onto the butterflies.
The sketch I've used is from Wednesday's Splitcoast Sketch Challenge.
I'm hoping that my son will have our new Mac up and running by the time I get home from school today. That will be the high point of the week for sure!!!!
Hope you have a couple of high points in your life too! Thanks for stopping by for a visit.
Joan
Stamp Set/s - Nature Walk, Thank You Kindly
Paper - Old Olive, So Saffron, Very Vanilla, Glossy White, Botanical Gazette DSP
Ink - Old Olive, Marina Mist, Not Quite Navy, Cherry Cobbler, So Saffron
Other - Sand paper, Modern Label punch, Ice Square Rhinestones, Sponge Daubers

Sunday, January 9, 2011

Oh the weather outside.....

Believe me....you would not want to be in one of these planes today - lots of snow has fallen the last two days, and the temperatures are falling.....

but....it is a great stamp set for masculine cards. This is one of the sets, Plane and Simple, which is featured in the new Occasions Mini.

I used some of the map paper from the "Newsprint" DSP. For the strip across the middle I used the Faux Linen technique - which is shown closer up in the second photo. I've also raised the center plane using dimensionals.

The sketch for this card comes from the Sweet Stop Sketch Challenge Blog.

I know that a lot of my facebook friends from around North America are covered with snow this weekend,
so I hope that where ever you are, you are keeping warm crafting, or snuggling up with a good book and a mug of something hot. I'm hoping to accomplish both of those things today!

Thanks for stopping by!
Joan


Stamp Set - Plane and Simple
Paper - Basic Gray, Basic Black, Very Vanilla, Newsprint DSP, Glossy White
Ink - Basic Black, Basic Gray
Other - Word Window Punch, sandpaper, sponge daubers, Circle Brad (retired), dimensionals

Saturday, November 13, 2010

Reflections and Shadows

At our last team meeting we did a mirroring technique using vellum. By stamping the image on one side of the vellum, flipping it over and restamping, you can create a mirrored (reflected) image quite simply. We brayered the vellum with the Night of Navy ink before stamping the image, and this creates a wonderful night scene.

One of my fellow stampers, Tamara Bertram (Tamara's Paper Trail) found an alternative method to this which I also tried and used at a workshop I held this week. After stamping the image on the piece you're using for your card, you can create the shadow using Tamara's instructions...."... I stamped the image on the clear image sheet from my Stamp-a-ma-jig and then turned the SAMJ over to "blot" most of the image off on a scrap piece of paper. Then I pressed the image sheet onto my card to transfer the light image."

I love how this turned out because it's more like a sunlight shadow than and evening reflection. You should check out Tamara's creation because she has created a wonderful "shore" where the image and shadow meet.

We have no snow yet - temperatures are a bit nippy, but I'm thankful I'm not having to manoeuver through snow yet.
Hope you're having a wonderful day - Thanks for taking time to stop by - Joan

Wednesday, February 3, 2010

Scrappy Music

I had a couple of minutes between workshops Tuesday night and threw this card together. It was quick and easy because every piece of it was scrap that I had in my little drawer.

The Bella was already coloured with a blue dress - I just added the contrast colour in the pleats and added gold pen to the Treble Clef and note.

The Hearts were left over from a previous project a couple of weeks ago. I punched holes in them once I decided how I was going to attach them.

The entire Saffron layer was already put together - Saffron, Bordering Blue and DSP. I added the Always Artichoke base and matt to the Bella - strung the organdy gold ribbon through the hearts and around the layer....and Viola - a done deal.

It was fun to put together. I bet I could spend a whole weekend putting left over pieces together. Maybe I'll challenge myself sometime. Not this weekend though!!!!

Hope all your bits and pieces are fitting together well today; thanks for stopping by,

Monday, February 1, 2010

Bold and an old Revision

Saturday's Inspiration Challenge was from a website that had purses - Espe - and Oh my word I love purses. I believe it has become my "midlife" obsession. The one I chose for my card is at the left - My card turned out NOTHING like I would have
wanted, but close. I've included a couple of other challenges with this card too....

Thursday's Ways to Use It Challenge was to add some textile to the card and over at Saturday Spotlight the challenge was to add something bigger than you usually use. I have a very hard time with these big Pretties flowers so thought it would become my challenge. I used a dauber with Gable Green so it
matched the one on the purse. I then layered some felt flowers which I keep forgetting to use.
To Centre it all off I added a rhinestone brad in the middle - can you tell??? :) WOW!

Next, I've started to think about cards for March's Technique Tuesday Workshop. I came across a card which I did at an Extravaganza a couple of years ago and I liked the layout. I don't have either of the stamp sets, and the colours were old "In Colours".....so I revised it into the card you see at the left - I used "Special Blessings" and "Three Little Words" I had to play around with the colours a bit because I knew I HAD to use
Cameo Coral.....I ended up with a whole bunch of packages and can't remember why.

The technique I used was Rock and Roll which you can find here through a tutorial by Beate Johns.

The body of the card is 4.25 X 11". It's scored at 5.5 and 2.75''. Only half of the bird layer is attached to the body of the card. The Scallop section is put on with a dimensional and then the frame is tucked underneath at the corner to keep the card closed.

Well, I'd better get to bed - gotta teach tomorrow. It's also my birthday and we just never know what the staff may have in store - so I'd better be rested and prepared. It's a short week too because Teacher's Convention is Thursday and Friday - Woo Hoo!!!

Thanks for Dropping by -

Sunday, January 31, 2010

Virtual Stamp Night - Let the Games Begin

Well, I spent Saturday Night on Splitcoast Stampers doing their Mini Virtual Stamp Night with the theme having to do with the upcoming Olympics. I hadn't done a VSN since spring of last year - it felt good to have the juices forced to create something in less than an hour for each challenge.

The first card, with the Maple Leaves, had to do with the parade at the Opening Ceremonies. We were to pick our favorite flag colours and create a card - well - I had to pick Canada just 'cause! To add a bit of zip though I created a small Olympic Inukshuk.
The second challenge was to "Chill Out" and to create something with a bit of ice or snow on it - using "flower soft" for snow or clear embossing powder. I don't have any flower soft - so I used the clear embossing powder on the little ice rink and then added liquid applique around the edges where Little Teddy has had to shovel off the snow. I cut her leg so that I could angle it into an arabesque - which she is executing without the aid of actual skates!

The Red Mittens which the Olympic Torch Runners are
wearing - and which have been available for purchase - was the theme of the third challenge. I remembered making this mitten for a workshop years ago, so dug out my sample and re-did it in red with a white embossed Maple Leaf. I tucked in a package of hot chocolate because the original project had been used as a "treat" bag of sorts.


Challenge #4 was to use the Chalkboard Technique - it's a two step technique in honor of the Olympic Biatholon. Here is a link to a fabulous tutorial by Beate Jahns. I had actually done this technique before so was able to jump right into it. I did FINALLY figure out how to use my corner punch properly! I am so used to holding my punches "upside down" that I was never succeeding in punching my corners - so I tried flipping the punch - saw the guidelines and viola - duh!!!!

Finally, our challenge was to keep in mind the "S" curves of the Slalom Course the the Olympics as well as using the Kissing Technique. I don't have any background stamps that are good for this technique anymore; so I used the variation which Beate suggests on her tutorial. I hadn't used glitter all evening, so I decided to add just a tiny bit in each of the panels.


Sunday will bring rest and paper cutting for my workshop on Tuesday.....and a few more puzzle pieces.

Hope your weekend has been wonderful - Thanks for dropping by

Saturday, January 16, 2010

Hearts & Snow


Well, I'm a little surprised that my heat gun hasn't fried because I sure did use it a lot this morning.

My first card is for today's inspiration challenge from the Accents section of Nell Hill's. I picked the little "love" piece, which is in the thumbnail, because it reminded me of the faux metal technique which I really do enjoy. I incorporated Our Creative Corner's Colour Combo Challenge which was to use blue's and greens of any hue.....I used Night of Navy and Taken with Teal.
To create the reverse embossed hearts I smeared versa mark onto a small section of paper, applied embossing powder and melted it. I repeated this process two more
times so that I had a section of embossed gold that was 3 "layers" thick. The last time I heated the piece I made sure that the heart was ready with Versa Mark on it and I quickly pressed it into the melted embossed section. I then decided to add a contrasting heart in the middle. Here is a link to the fantastic step by step instructions for this technique by Beate Johns.

The adorable little snowman was drawn by Tracy Vinson's 8 year old neice. Tracy is the Owner and Designer of Sugar Creek Hollow Digital Images and Primitive Paper and asked the design team to use this image today. I knew right away that I wanted to cut up his sections and make him stick out from the paper. I guess I didn't really have to cut them all up - but it was more realistic in my mind. The middle section has actually been raised twice. I covered him with Dazzling Diamonds and added seed beads for his eyes and mouth. The colours are in answer to "Stamp Something's" colour combo of blue and white.

It's now time I got down to some other sort of work. I should clean the house a bit, and I need to start cutting paper for an upcoming Birthday Card Camp. My husband and I have a Christmas Dinner tonight for the Josephburg Choral Society......then the season will be over.

Have a great Saturday and thanks for dropping by,

Sunday, February 22, 2009

More VSN cards

I can only load five cards at a time so I'll be sharing VSN cards for a while! I made 12 yesterday in 12 hours - today I have a migraine - go figure!!!!

This first shell card was done with the melting crayon technique. Too cool - (I've given you the tutorial link) It was fun to do and easy to figure out in the time limit. I have a band of microbeads across the top, trying to be sand ...


This bee card is a case from one I got from my upline - Lori. There are holes punched along the side and the little bees are inside the card. The challenge was to make a card for someone you loved.


This is not a favorite of mine. We had to use only things that began with the letter L - for Love. So I used Lavender Lace and Lovely Lilac. I added a "lacey" border and used "letters" to make the message for the cup of "latte". I wish I had L embellishments.

This flower card was using the "Joy Fold". It's easy to do with Beate's Tutorial. I used one of the current Sale-a-Bration sets and used some Non-SU gems in the centre of the flowers.


For this challenge we had to find a stamp/set that was one of our first purchases. I've had this stamp for years and was glad to be able to bring it out for a spin. I added a strip of sticky strips with red beads along the bottom.

That's all I'll share today.
Thanks for stopping by - JOAN

Monday, June 16, 2008

June 16

As soon as I saw these vases for the inspiration challenge from Acacia last week I knew I wanted to try something......it doesn't show up totally clear in the photo, but I inked up the Floral background stamp and then kissed the dotted background to it to make the background image. You get just tiny bits of the flowers within the different boldnesses (a word????) of the dotted stamp. This is also the sketch challenge for last week.

The weather just may be picking up here.....I just might - MIGHT look forward to recess supervision tomorrow.....LOL.

Thanks for dropping by - Happy Stampin' - Joan

Wednesday, February 27, 2008

Chalkboard Technique

Today I decided to try Beate's tutorial for the chalkboard technique. It seemed pretty easy, and actually was. However, I think I may try something smaller than a sponge dauber the next time I'm trying to colour a small image. I've also wanted to use my sticky letters for quite a while so tried to fit one in as the "cut out" image of the Sketch Challenge. It's funny how one card can almost make itself and others (such as this one...) need to be fiddled with and pondered over. Oh well.....

To follow Beate's tutorial click HERE

To see other cards which include the chalkboard technique click HERE

Also, thank you to all our stamin' friends who have signed our guest book after reading your newsletter. Amy and I are enjoying reading them. Thank you so much for your support....and thanks also to the blogging community we've joined up with.

Sunday, February 17, 2008

Awesome Glitter

I haven't posted anything the last two days because of our All Occasion Card Camp....all three sittings were great, it was good to see people we haven't stamped with for a while, and great to meet new people too.
Patty G. took home a Simply Scrappin' Kit and Angie C. each took home a stamp set because they won the draw for having paid for the workshop ahead of time. Congratulations!!
The card I've posted here is one I put together yesterday morning before the camp. I wanted to try out one of the new sets from the upcoming Occasions Mini (I LOVE that the stamps are all die-cut and you just have to pop them out to mount them!!!). I am also loving the new chunky glitter!!