Thursday, May 21, 2020

How Do I Use This? - Sponge Brayer

 Last night I had my "How Do I Use This?" Facebook Live and today I'm sharing the cards I created to demonstrate the different things you can do with sponge brayers.

The first technique I shared was the Ombre technique.  I used Soft Seafoam, Pear Pizzazz and Old Olive.  I brayered the Soft Seafoam down first then added the next  colours in line trying to create a smooth transition from one shade to the next.  The accent is from the upcoming Forever Gold Laser Cut Specialty Paper. The Hello is from the new Forever Fern stamp set.

 Next, I did the Emboss Resist Technique.  The technique works with either sponge daubers or the sponge brayer, but you can cover more area with the brayer.  I covered the paper with the blossom  and foliage from Tasteful Touches stamp set using Versa Mark and White Embossing Powder.  After embossing, I used Rococo Rose ink and brayered until I got the desired shade.  You need to remember to gently wipe off the ink that sits on the embossed area.

 I don't know that there is a name for this technique - I brayered the inside cover of the Parisian Flourish Embossing Folder with Crumb Cake ink.  When I put it through the Big Shot, the ink went into the depressed areas of the design.  The stamp set I used is Very Versailles using Pretty Peacock ink.

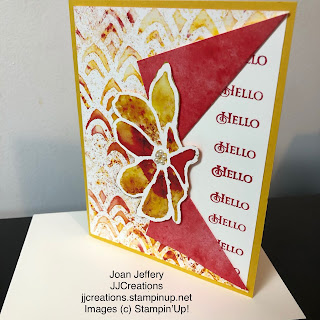
Finally, I tried to create some movement on the paper by curving the brayer as I applied the ink.  You could create more of an effect if you did this on larger paper and then cut it down to size.  The colours I used were Old Olive, Cajun Craze and Crushed Curry.

Any of the new stamp sets I've used will be available from the new catalogue when it goes live on June 3.  If you would like a copy of the catalogue, let me know and I'll get one out to you.

I hope you found some inspiration to pull out a brayer and use it.  All the techniques can be done with either the sponge brayer, or the rubber brayer that we used to sell.

Thanks for visiting today.
Stay Safe,
Joan


Wednesday, May 20, 2020

Someone's Blessing


Today I thought I'd do the challenge from Hand Stamped Sentiments.  These colours work so well together.
The images are from Beautiful Moments and I love this sentiment.  I used some of my Seaside Spray Scalloped Linen Ribbon - cut in half so the linen part doesn't show.  The little girl's dress is paper pieced from the In Colour DSP.  Finally, I used my Stampin' Blends to colour three pearls in the matching colours to add a bit more to the card.

Short and sweet for today.  I have some work to finish up on for tonight's "How Do I Use This" Facebook Live.  Tonight's session is on the Sponge Brayers.  Fun, fun, fun.

I hope you are staying safe and healthy.
Thanks for stopping by,
Joan

Saturday, May 16, 2020

Smile and Thanks

 Just a quick post with two cards I created to use up some Designer Series Paper.  I really enjoyed working with the paper we had this year and the coordinating stamp sets.

The above card was created for a challenge, but then time passed and I missed the deadline for posting.  I'll use this layout again, it's clean and simple.  Maybe I'll even use it for a Mystery Card Monday some time.
I've layered both sizes of daisies after adding some veins on them...just to perk them up a bit.

I'm letting the DSP do all the work for this card.  I love these big bold flowers and I get to use some red accents which I don't do very often.

Like I said this is short and sweet.
Thanks for visiting.
Stay Home, Stay Safe
Joan

Friday, May 15, 2020

How Do I Use This? - Stamparatus


Wednesday night I had my How Do I Use This Facebook Live using the Stamparatus.  Today's post shows the various cards I created using this awesome stamp positioning tool.  My first card was also created for this week's challenge over at Sunday Stamps.


With regard to the Stamparatus, I used it to make sure that this negative image from Silhouette Scenes was crisp and dark.  I have difficulty with getting negative images dark enough the first try. So the Stamparatus allows me to restamp the image with no worries.

Two step stamping is made easy with the Stamparatus.   You can play around with the stamps until you get them perfectly placed, and then create as many cards as you want without having to worry about repositioning the stamps. I used Soft Spring for this card.


Stamping multiples of the same images is easy with the Stamparatus because of the removable hinged plates.  The leaf from Rooted in Nature was used for the first card.  I've also used DSP as the base of the card.  I included a piece of cardstock on the inside for writing.
The Collar Fold was used for this second card with the See a Silhouette DSP.  The little Hello is from the Honey Bee stamp set.

I was having difficulty positioning this greeting nicely over the bee hive using the clear blocks....but when I put the two stamps together on the Stamparatus it worked out perfectly.  I'm going to miss this Honey Bee stamp set - I really like the little bees.


The technique for this card is called Round & Round.  You need to create a template first, but once you have the template you can make any number of these little wreaths using  flowers, leaves, hearts, and butterflies.  There's no limit to your imagination.  I used the tiny butterfly from Butterfly Wishes for this card.

That's it for today
If you would like to watch my Facebook Live on the Stamparatus, where I demo each of these techniques you can find me at JJCreations247 and the video is labeled the same as today's post.


Thanks for dropping by.
Stay Home, Stay Safe
Joan

Thursday, May 14, 2020

Catching Up -Mystery Card Monday

Monday was my Mystery Card Monday night and these are the cards that I created from the recipe which is shown below.  I had a number of people participate  and I always enjoy seeing what they created when they post their cards on my Facebook business page.

Each of these cards is pretty straight forward in design using embossing folders to add texture and a bit of Designer Series Paper.
For the above card, I coloured three pearls with the Mint Macaron Stampin' Blends Marker.  Because the markers are alcohol based, you can colour your embellishments to match your card. 


Today I've used stamp sets which are continuing into the new catalogue which goes live June 3.  If you would like to reserve your copy, send me an e-mail and I'll set one aside for you once I get them.

If you'd like to join me for next week's Mystery Card Monday, you can find me at JJCreations on Facebook.  I go live at 7:00pm MT.  

Thanks for dropping by today,
Stay Safe,
Joan

Monday, May 11, 2020

Rococo Rose Wishes

 I can't believe it's been so long since I've posted anything.  I've been busy making cards, and when we had sunshine I was busy cleaning out my garden.  It's overcast today so I decided to do a challenge....from Just Add Ink.

I've used Healing Hugs...and a lot of layers.  I took the coordinating Rococo Rose Ribbon and coloured in the Crumb Cake linen with my Basic Gray marker, making it coordinate perfectly with the card.   I imagine you could do this with most dark inks. I also added some veins on the leaves - that's a me thing.

That is all for today. Short and sweet.
I hope you are well in your corner of the world.
Thanks for visiting
Stay Home, Stay Safe
Joan