Wednesday, February 29, 2012

In the Spotlight


I haven't done the spotlight technique in quite a while....and of course I got carried away with things again yesterday.  Actually, I decided that the card I created for the challenge at The Paper Players (the sketch is from this weeks challenge) and SUO Challenges (creating a birthday card) was a bit too much for my technique class, so I revamped it using last weeks' Freshly Made Sketch to simplify it a bit.

I think these "Packed for..." stamps are perfect for this technique!  I stamped the image three times in a row and then punched out the small circles, to be coloured and backed with the large Not Quite Navy circle to create the spotlight.

Because everything is pretty straight forward of this card, my stampers will be given the option of which "Packed for" image they'd like to use.  The sentiment goes with all of them - Mom, Dad and Birthday.

I'm all packed for my next convention and looking forward to having a fantabulous time with Tamye!
Hope you have something to look forward to this week.  Thanks for stopping by.
Joan

Tuesday, February 28, 2012

Clipboard Diversion

I am SUPPOSE to be getting my stuff together and packed for another Teacher's Convention.....but what did I get side-tracked into doing yesterday afternoon????? - decorating the clipboards I use for people to sign up for classes.

I have never done anything like this before - and you can sort of tell.  The Baroque Motif board on the side was my first one - done with black Staz-On.  I added the black velvet piece from Mocha Morning - so seriously - velvet on a clipboard - a bit over the top!

Next, I put dragonflies only along the edge of the second board and added a piece of dotted paper from the Playful Polkadots Simply Scrappin Kit, and I used three different kinds of ribbon. Far simpler than the first attempt.

Finally, I used Inspired by Nature with Soft Suede and Early Espresso Ink.  The butterfly from "Nature's Nest" is fluttering around the edge and the clip is covered with a piece from Attic Boutique.  I also punched out some butterflies with the Big Shot and added pearl bodies to the ones at the top of the board.

For all three boards I used the Multipurpose Adhesive Sheets to make the paper stick to the clip, and the board in the case of the butterflies.

All in all a productive afternoon - not just quite what I expected.

Hope your day is productive today - Thanks for stopping for a visit.

Joan

Monday, February 27, 2012

Get Well Stamps

Good Monday Morning - Just flying out the door to school but wanted to post this card I created yesterday in preparation for the March technique class.  This is not the technique of the month - just a case of a Christmas Card that I got from my fellow stamper, Amy Barry.  I've used the SAB Designer Series Paper and the matching Fresh Vintage stamp set, ribbon and brads.

Hope you have a marvellous start to your week.  Thanks for stopping by.
Joan

Friday, February 24, 2012

Birthday Stamp-a-Stack Coming Up

Wow, life is busy - but that's what keeps us out of trouble - right?  I've got literature, music and stamping on the brain right now - a bit of an overload but we just work through one day at a time and it all works out in the end.

So - one upcoming stamping event is my Birthday Card Stamp-a-Stack.

March 3, 2012
1:00-4:00   OR 5:00-8:00
Cost $25.00 (OR $20.00 for Club Members)
Cost includes 15 Birthday Cards with co-ordinating envelopes, light snacks, door prizes
Bring along a friend who has never stamped with me before and get a gift from me.

Here are the 5 designs - you'll create 3 of each


Saturday afternoon - 1:00-4:00pm   RSVP HERE

Saturday evening - 5:00-8:00pm  RSVP HERE

Hope you have a great day - coming back soon with some challenge inspirations.
Thanks for stopping by - Joan


Sunday, February 5, 2012

Final Spritzing

I had a fantastic day yesterday stamping with friends at the Extravaganza.  Lots of wonderful projects I'll share over the next few days - but today I'm showing the last two projects from my demonstration.  I used the Blushing Bride Smooch Spritz using the sketch from Freshly Made Sketches for both examples.

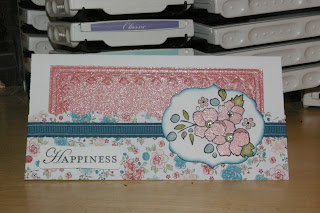
For the card above, I took two of the paper daisies and "painted" the Smooch Spritz onto them with the Aquapainter.  What a wonderful effect - the petals take on the shimmer of the spritz.

Finally - I used the last "technique" suggested in the January Stampin' Success Magazine - "Direct and Deliberate".  That's exactly what I did - spritzed the piece of Blushing Bride card stock until there was no original card stock unspritzed.  Glorious Shimmer!  I  also painted the flowers, from the Bordering on Romance set, with the smooch.

So that's it for spritzing - I'm excited to see what's coming up for the Summer Smooches Suite later this spring.  Now I turn my attention to preparing for a booth at an upcoming Teacher's convention.  
Fun, fun, fun!  Can't wait!

Hope you have things to look forward to in your near or distant future!  Thanks for stopping for a visit.
Joan

Friday, February 3, 2012

Smooch Spritz Mashup!


Even though this post is coming in late I'm pleased that I got the Friday Mashup done on Friday.  I will be using this card in my demonstration tomorrow.  First - the Friday Mashup begins with an inspiration photo


  1. Make a project using the "Inspiration Photo".
  2. Or Make a project using the colors "Cherry Cobbler, Regal Rose & Whisper White".
  3. Or "Mash it Up" and create a project "Inspired by the photo using the colors Cherry Cobbler, Regal Rose & Whisper White".
I used the Paper Doily Sizzlits die and used it as a mask for spritzing the Vanilla Shimmer Smooch Spritz over top.  It got a bit heavy in some section, but was okay once it had dried.

I think I'm ready for our Extravaganza tomorrow - I'll have more to share with you then - and one more spritz idea.  Have a wonderful weeked - thanks for stopping by.
Joan

Wednesday, February 1, 2012

Smooch Painting

This morning I tried painting with the Smooch Spritz.  Again - I'm using the suggestions from the January Stampin' Success.  I sprayed some of the Blushing Bride Smooch Spritz into an empty brad container and for this first card I used water-colour paper, and an aqua painter to apply the spritz to the image.  I love how it makes the flower shimmer.  And - just to keep with the theme, I spritzed one of the crocheted flowers - it's very subtle, but you can see the glimmer on the thread (in person).


I've used the Mojo Monday sketch for this card (however, I left the card rectangular instead of square or round.  I also used the challenge from SUO Challenges to use a favourite item from the Occasions Mini.  I must say I am enjoying this Smooch Spritz and I love the pleated satin ribbon.  I have discovered, however, that if you are wanting an image to straddle the ribbon, you need to stack two dimensionals together so that the image remains flat, and not bent over the ribbon.

Here is a second card, using the same two challenges, but for the image, I used regular Whisper White card stock and a blender pen to "paint" on the Smooch Spritz.  The card also includes another new favourite - I think these little buttons are adorable - I love the designs!


On the weekend I used the Lace Ribbon Border Punch to help create this background design with the Blushing Bride Spritz.  For the Chocolate Covered Strawberries I coloured the chocolate with marker and then added Crystal Effects to gloss it up.  The tops of the strawberries have the new Cherry Cobbler Dazzling Details.  The strawberries have been raised up with dimensionals - but the stem is on the little white base.

I'm still doing some experimenting with this spritz. Fun, Fun, Fun.  
Done for the day though - hoping my hubby and I can go out to dinner for my birthday this evening.  Hope you have something wonderful planned for your evening - or sometime this week.

Thanks for stopping by -
Joan